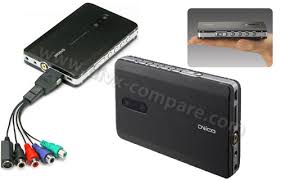
HD M-5000U - Lecteur multimédia TVIX - Notice d'utilisation et mode d'emploi gratuit
Retrouvez gratuitement la notice de l'appareil HD M-5000U TVIX au format PDF.


| Intitulé | Détails |
|---|---|
| Type de produit | Lecteur multimédia HD |
| Caractéristiques techniques principales | Support des formats vidéo : MKV, AVI, MP4, etc. Résolution maximale : 1080p |
| Alimentation électrique | Adaptateur secteur 12V |
| Dimensions approximatives | 210 mm x 160 mm x 50 mm |
| Poids | 1,2 kg |
| Compatibilités | Compatible avec les systèmes NTFS et FAT32 |
| Fonctions principales | Lecture de fichiers multimédias, enregistrement vidéo, sortie HDMI |
| Entretien et nettoyage | Utiliser un chiffon doux pour le nettoyage, éviter les produits chimiques |
| Pièces détachées et réparabilité | Réparabilité limitée, pièces disponibles auprès du fabricant |
| Sécurité | Ne pas exposer à l'humidité, respecter les normes électriques |
| Informations générales utiles | Vérifier la compatibilité des fichiers avant l'utilisation, mise à jour du firmware recommandée |
FOIRE AUX QUESTIONS - HD M-5000U TVIX
Questions des utilisateurs sur HD M-5000U TVIX
0 question sur cet appareil. Repondez a celles que vous connaissez ou posez la votre.
Poser une nouvelle question sur cet appareil
Téléchargez la notice de votre Lecteur multimédia au format PDF gratuitement ! Retrouvez votre notice HD M-5000U - TVIX et reprennez votre appareil électronique en main. Sur cette page sont publiés tous les documents nécessaires à l'utilisation de votre appareil HD M-5000U de la marque TVIX.
MODE D'EMPLOI HD M-5000U TVIX
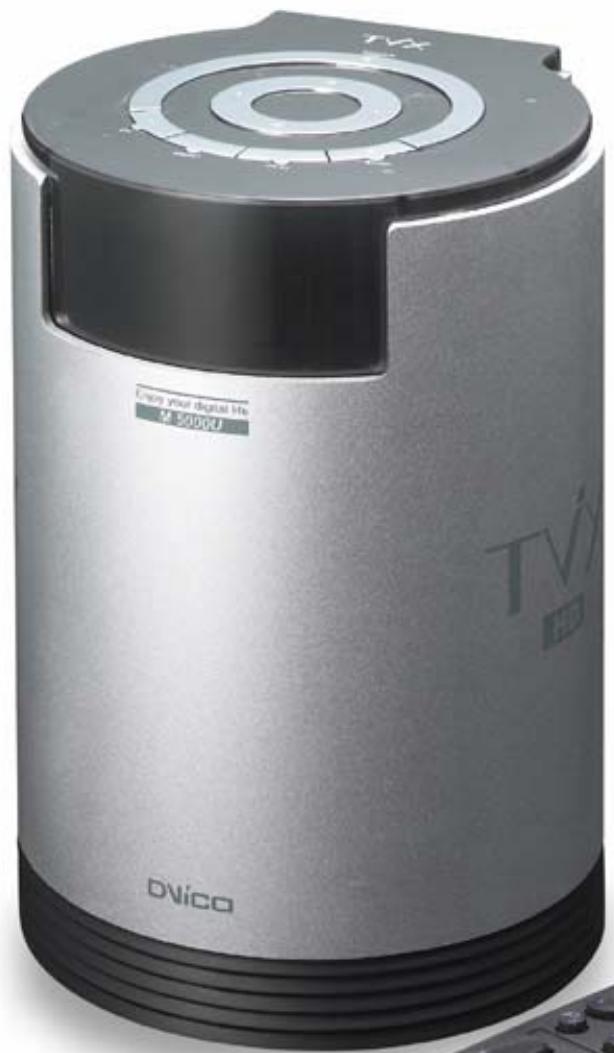
TViX HD M-5000U/M-5000A
Safety Notice

Keep your TViX away from heated areas, such as sunlit areas, heaters etc. Set it up in well ventilated places. Ensure that a free airflow is maintained around the appliance.
Do not set the TViX up in places that are exposed to oil, water, dust, humidity or rain and wind.
Keep all magnetic materials away from the TViX. Magnetic materials such as speakers or magnets may erase or cause damage to the data stored in the hard disk.
Do not try to disassemble or remodel the device. Doing so may cause malfunction or fire.
Do not touch the power plug with wet hands or use defective power cables & electric outlets. It may cause electric shocks or fire.
Do not drop the device. Doing so may cause critical damage to the hard drive.
The socket-outlet shall be installed near the equipment and shall be easily accessible.
Usage Precautions
Please read the following usage precautions before using your TViX HD.
- Make sure the power is off when you connect the A/V cable between the TViX and the TV.
- When cleaning the TViX product, pull out the power cord and then wipe it with a soft piece of dry cloth.
- When connected to the computer through the USB cable the TViX HD acts as an external USB storage device (In this state, there is no video/audio output and the VFD will show as USB ON). For normal TViX play mode, disconnect the USB cable connected to the computer and turn on the TViX HD.
- When the TViX HD is playing and the USB is connected to the computer, a USB ON icon will be displayed on the center of the screen. Disconnecting the USB port will show the original screen.
- Make sure the jumper setting of the hard disk which is installed on the TViX HD is set as Single Master. Otherwise the hard disk will not be recognized by TViX HD.
- When detaching the HDD, please let the heat out sufficiently.
- The supplied cables and accessories are recommended for customized best performance of the TViX HD. Using other cables or accessories may not provide best performance.
- If you want to unplug the device, press the Stop button in 'Unplug or Eject Hardware'.
- Windows 98SE and Windows ME does not support NTFS file format. However, NTFS file format is available on Windows 2000/XP. "Primary Partition" is recommended when creating two or more partitions with a single hard disk drive.
- If you choose FAT32 file format on Windows 2000/XP, the drives maximum size will be limited to 32GBs.
If you want to use a single drive letter of 32GBs or more, you have to format on Windows 98SE/ME. -
The certification sticker mark is on the bottom of the device.
The Difference between M-5000A from M-5000U. -
M-5000U will power up after the main power switch (at the back of the unit) is turned on.
-
M-5000A will power up only after you press power switch on the top of the unit or using remote tranceiver.
Other functional features are exactly same and both use the same firmware.
- You can insert the character using remote-numeric key. Number 1 key is changed as : / _ - when this key is pressed.
** Some functions will require you to update the firmware in first.
Table of Contents
Safety Notice 2
Usage Precautions 3
1 Introduction. 5
1.1 Multimedia Player 5
1.2 Audio Player 6
1.3 External Storage 6
1.4 Specifications 7
2 Name of Each Part 8
2.1 Unit Control 8
2.2 Front VFD 8
2.3 Cable Connection 9
2.4 Package Contents 9
3 Installation and Connection 10
3.1 Making an HDD Folder 10
3.2 Video Connection 11
3.3 Audio Connection 13
3.4 LAN Connection 14
3.5 HDD Installation/Exchange 22
4 TViX HD Setup Menu 24
4.1 Audio/Video Setting 24
4.2 MISC Setting 26
5 Easy Usage of TViX HD 28
5.1 Play Video Files 28
5.2 Play Audio Files 29
5.3 Play Image Files 30
6 Using the remote control 31
6.1 Basic Functions 31
6.2 Descriptions of Each Buttons 32
6.3 Extra Features 39
7 Firmware Upgrade 43
8 Using USB Connection with the PC 45
8.1 Windows 98SE Driver Installation 45
8.2 Making a Partition and Formatting the HDDs under Windows 98SE / ME 49
8.3 Making a Partition and Formatting the HDDs under Windows 2000 / XP 51
8.4 Unplug or Eject Hardware 54
9 Appendix - Technical Terms 55
10 GNU General Public License 57
1 Introduction
1.1 Multimedia Player
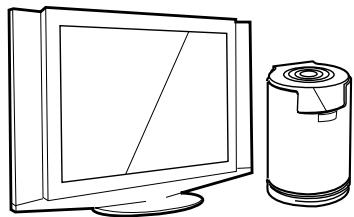
TViX HD is a standalone, multimedia hard disk player which plays digital videos, digital music, digital still images and DVD files to a TV display and home entertainment system. You can enjoy digital contents in your living room without having to burn discs or having to play it back on a DVD or CD player anymore.

TViX HD plays back DVD movies with the full functionality of DVD navigation. You can create your own virtual DVD library by storing your personal collection of DVDs in .ISO or .IFO format and watch them exactly as if they were running from the original DVDs (all original features included: Menu, Chapter, Audio Stream, Subtitle, Fast Forward, Rewind, Slow, Pause, Step Forward, Repeat, Search etc.).

TViX HD plays back high definition video (up to 1920x1080i) and still images. Pre-recorded HDTV programs from a digital TV set-top box or personal digital video contents taken by a HDV^TM camcorder can be played back with the TViX HD on a high definition display. The TViX HD features a DVI connector and component, which will match the high resolution of HD level video contents.

Using the latest EM8621 processor, TViX HD supports the latest multimedia formats (WMV9 & WMV HD) as well as MPEG4 3.11,4.0 and 5.0.

Using the high definition DVI output, you can directly connect the TViX HD to your HDTV.

TViX HD supports DTS hardware decoder to mix DTS sound into 2 channels for a more dynamic sound quality.

The TViX HD can be networked with a PC system using its built-in LAN port. You are able to navigate to a PC file through TViX HD's network and play the file from its original destination without having to copy it into the TViX first.
The TViX HD can be networked with a PC system using its built-in LAN port. You are able to navigate to a PC file through TViX HD's network and play the file from its original destination without having to copy it into the TViX first. We're supporting the file copy via LAN.
With two USB2.0 host ports, you can now attach additional external USB hard drives to further extend the storage capacity or transfer files from another USB device such as a thumb drive. You can also playback files from a digital camera, USB flash driver, USB flash card reader, or a MP3 player.
1.2 Audio Player
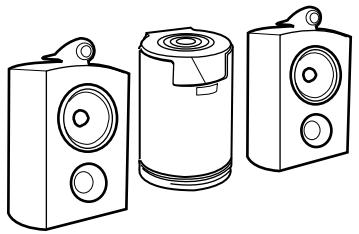
- TViX HD can play a variety of audio files such as FLAC, MP3, Ogg Vorbis or WMA (Windows Media Audio) through the TV speaker and any other audio systems. You can listen to your favorite music files nonstop, by organizing a custom winamp playlist. Now you can enjoy music all day without changing CDs.
- You can watch picture slideshows with the option of background music (supports music slideshows using picture images).
1.3 External Storage
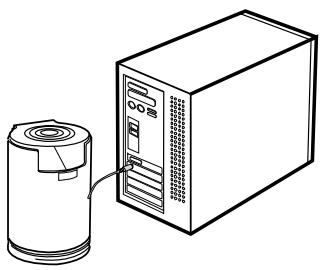
- If you connect to a USB 1.1 port, the TViX HD will work at USB 1.1 speed, so we strongly recommend that you use USB 2.0.
It can be used as an external device to save video, audio, image files, data, program backups, etc. - USB 2.0 enables TViX HD to become an external storage device which supports up to 480Mbps.
- It supports Plug & Play, so Windows will automatically recognize TViX HD.
- If you connect the USB port when playing the TViX HD, the VFD will show as USB ON. When you disconnect the USB, you do not have to reboot the TViX HD for continuous use.
- If you are a Windows98SE user, you should download a USB storage driver from our website www.tvix.co.kr/Eng before you connect your TViX HD with your system. You do not need to install a driver in Windows ME/2000/XP.
- You can download NetShare installer from our website www.tvix.co.kr/Eng before you configure NFS network. If you select to NFS mode, you can play the TP or DVD jukebox without stutter.
1.4 Specifications
| Main Chipset | Sigma Design EM8621 |
| VFD Display | 7 Alpha-Numeric Character |
| 5 Digit Numeric Display | |
| Video | Format:.wmv, .avi, .mpg, .vob, .mp4, .asf, .tp, .trp, .IFO, .ISO |
| Codec: MPEG 1 / 2 / 4, AVI, XVID | |
| Resolutions up to 1920 x 1080i | |
| Audio | MP3, WMA, AAC, Ogg, PCM, M4A, FLAC, WAV |
| AC3, DTS Pass Through and Down Mixing | |
| Photo | JPG |
| Connectivity | USB2.0 Host 2 Ports USB2.0 Target 1 Port |
| LAN (10/100Mbps) | |
| Multi I/O Jack (Optional Breakout Box) | |
| AV In / Out | Video |
| DVI, Component, S-Video, Composite, | |
| Audio | |
| Digital: Coaxial, Optical / Analog: Stereo | |
| File Formats | NTFS, FAT32 |
| Subtitle | Text Subtitle: smi,sub,srt,aqt,utf,lrc / Image Subtitle: sub (with idx) |
| ODD Support | Through USB 2.0 Host |
| Language | English, French, German, Spanish, Italian, Portuguese, Swedish, Norwegian, Danish, Japanese, Korean |
| FAN | 40mm Brushless FAN |
| FAN Control | Temperature Sensing, Variable Speed |
| Main Memory | Main Memory |
| Flash ROM | 8 Mbyte |
| Internal Power | 90~240V Free Voltage |
| Shape | Cylindrical |
| Dimension | 131mm (Diameter) 185mm (Height) |
| Weight | 1,200g (without HDD) 1,800g (with HDD) |
2 Name of Each Part
2.1 Unit Control
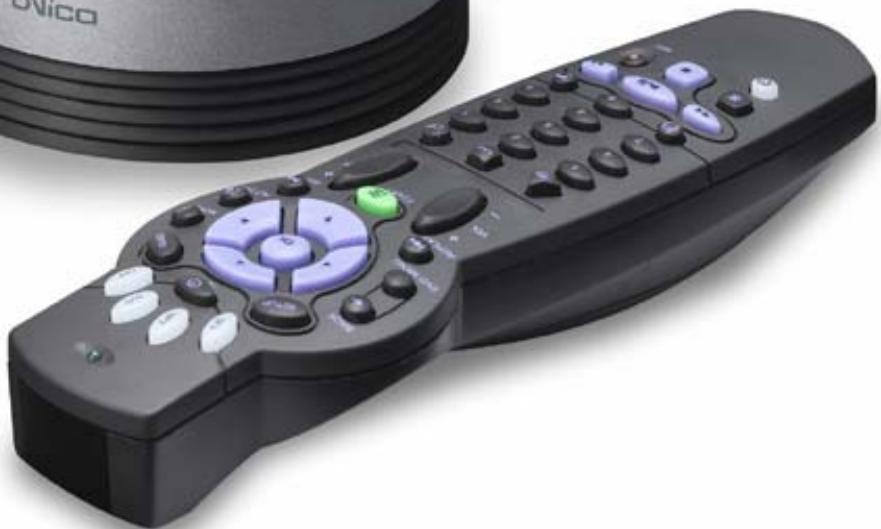
Basic functions can be done without the remote control.
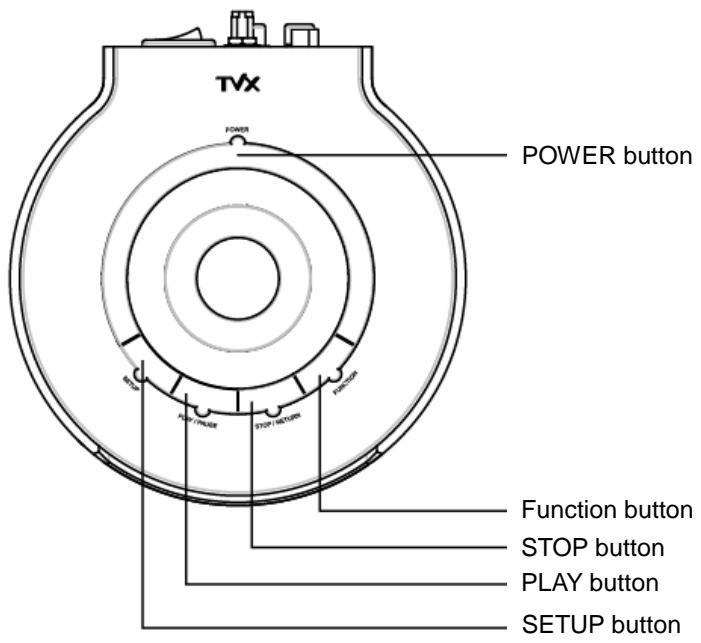
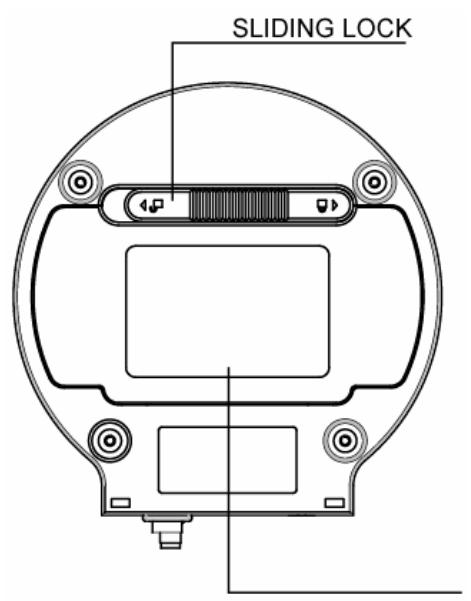
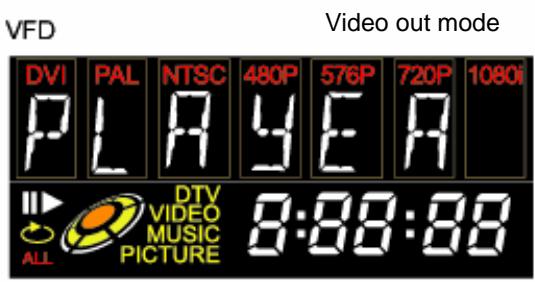
2.2 Front VFD
Information will be displayed on the VFD.
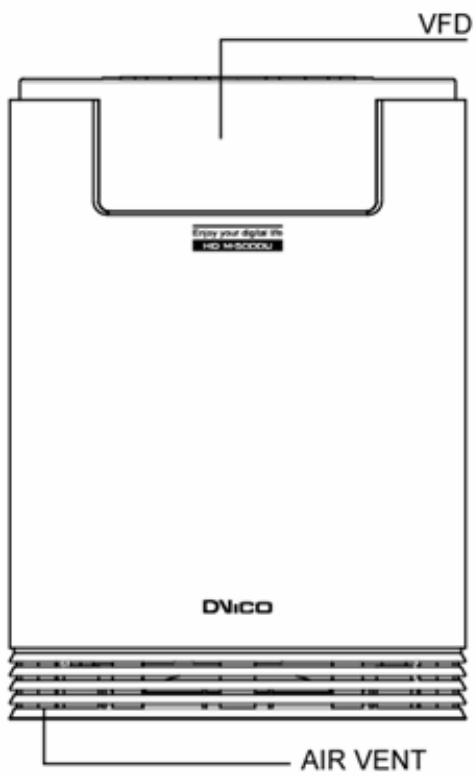
Play mode and information
VFD shows current Folder/Filename while navigation. Due to display(VFD) restriction we only support English alphabets.
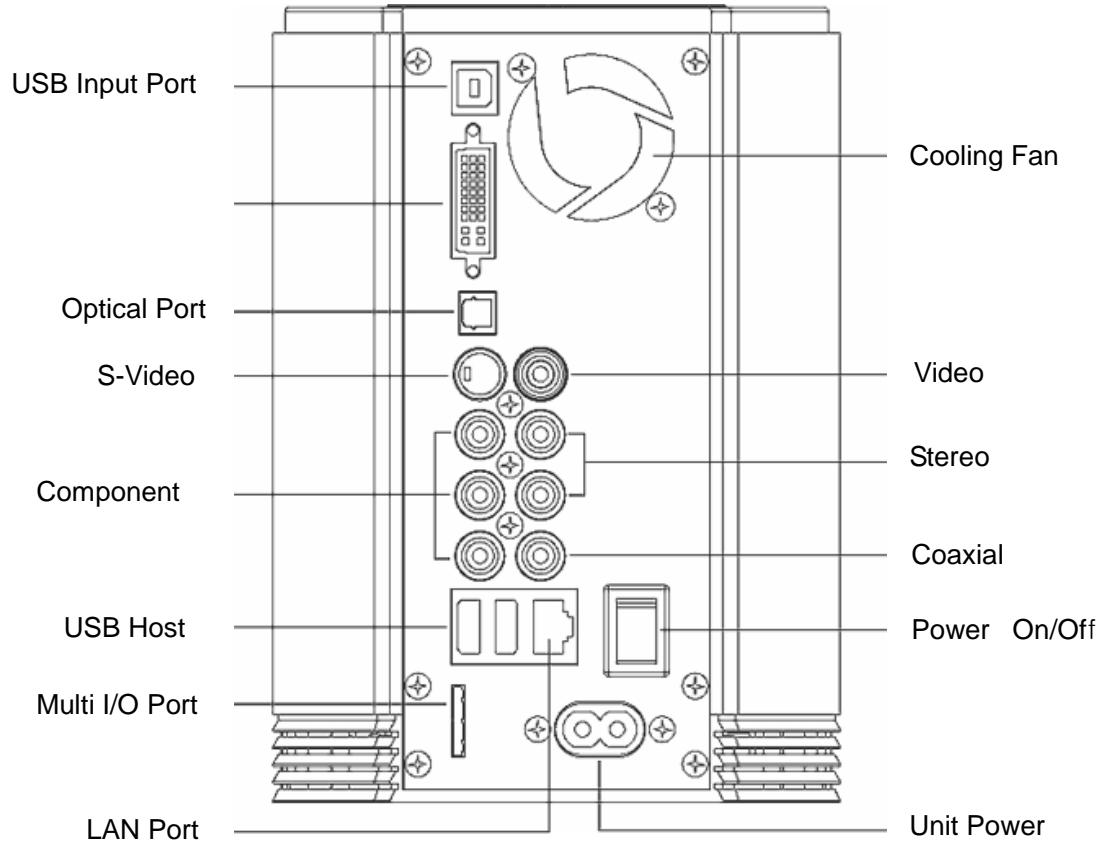
2.3 Cable Connection
You can connect the TViX to a TV display or audio Amplifier using the A/V cable.
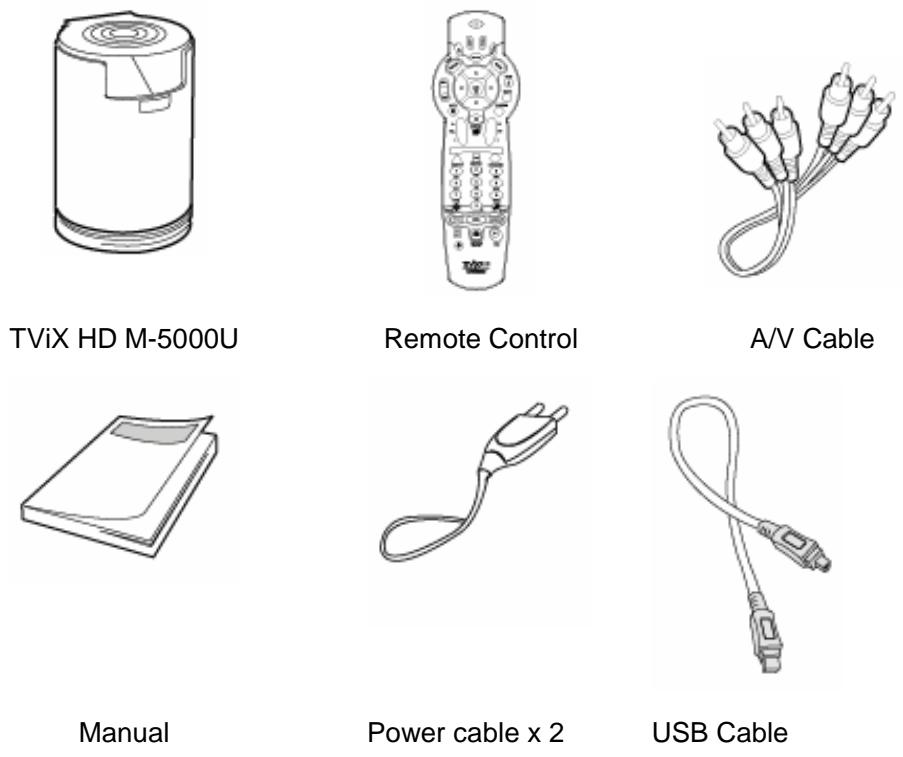
2.4 Package Contents
3 Installation and Connection
3.1 Making an HDD Folder
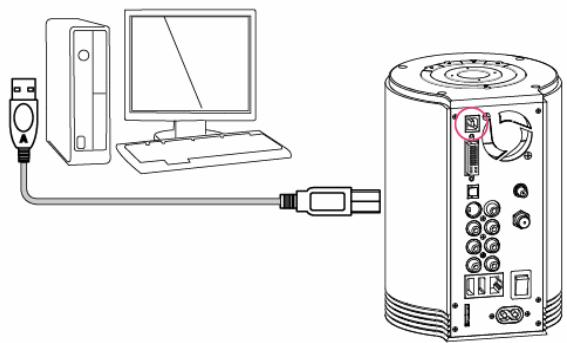
- As shown in the picture below, one end of the USB cable should be connected to the USB connector of the TViX and the other end to the computer.
CAUTION!
The USB cable has a different shape on both ends. We use a USB 2.0 type "A" Plug(male) to "B" Plug(male).
- After connecting to the PC, turn on the power of the TViX.
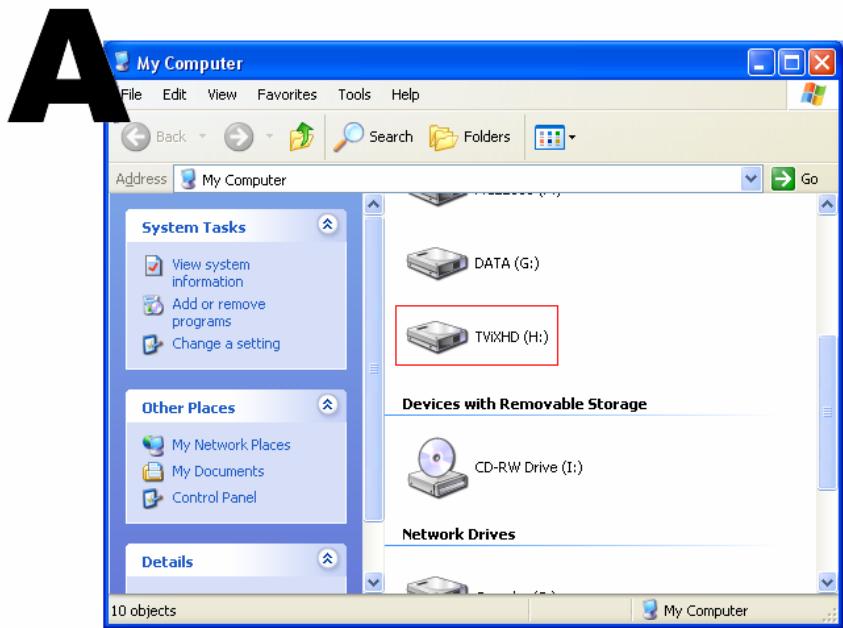
- Double click the icon 'My Computer' on your monitor and you will see a newly created drive; TViX (D:) as shown in picture 'A'.
(The name of the drive can be changed.)
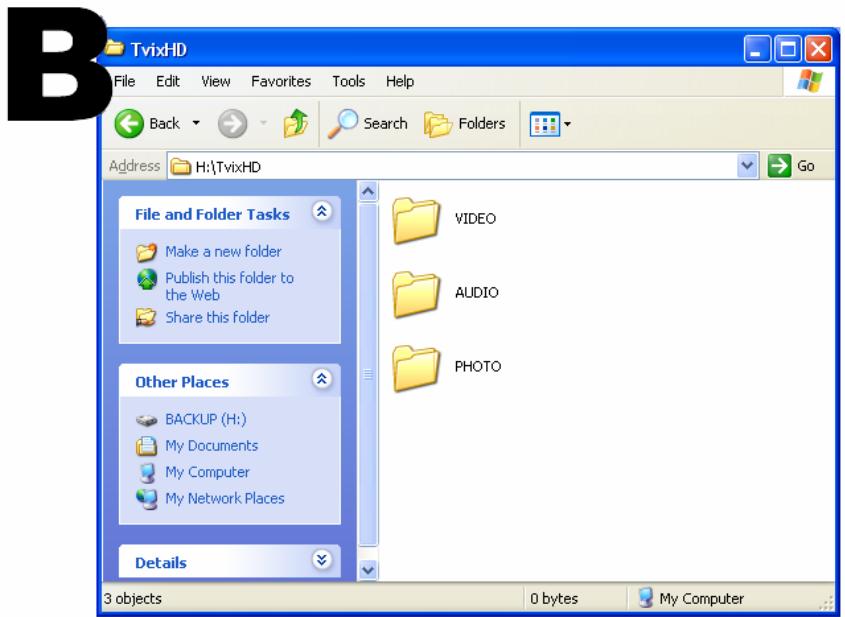
- For easy usage, double click TVIX (D:) and make separate folders named video, audio, and photo. Then store all your files accordingly to each folder.
3.2 Video Connection
We support DVI, Component, S-Video, Composite video output for connecting to the TV and each output needed to change settings on the TViX HD.
The highest quality components are as follows: DVI > S-Video > Composite.
3.2.1 Connection with an Ordinary (Composite) TV Output
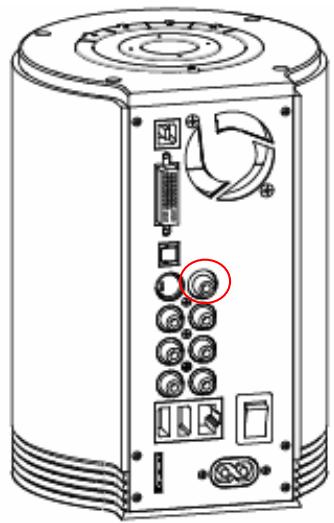
Connect the TViX HD and your TV using the yellow video cable.
Turn on the TViX HD and TV. Select an appropriate video input mode on your TV until you get the initial TViX HD screen.
3.2.2 Connection to S-Video Output
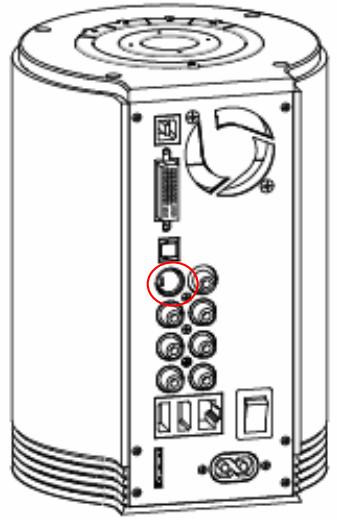
Connect the TViX HD and your TV using the S-Video cable.
Turn on the TViX HD and TV. Select an appropriate video input mode on your TV until you get the initial TViX HD screen.
(The S-Video cable is not included and has to be purchased separately.)
3.2.3 Connection to Component Output
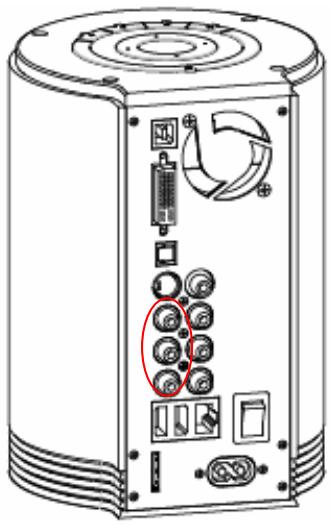
Connect the TViX HD and your TV with the component cables.
Turn on the TViX HD and TV. Select an appropriate video input mode on your TV (in this case, the Component input mode).
3.2.4 Connection to DVI Output
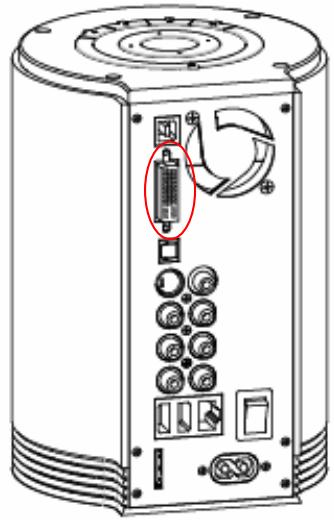
Simply connect your TViX HD to the DVI port on the TV. However, if the TV has a HDMI port only, you need to buy a HDMI cable to convert the DVI data and then you will be able to see the processing digital signal.
CAUTION
After you connect the video cable to your TV, press the TV Out button repeatedly on your remote control until you get the initial TViX screen.
- The component cable is not included in the TViX and must be purchased separately.
3.3 Audio Connection
3.3.1 Connection to 2 CH Normal TV
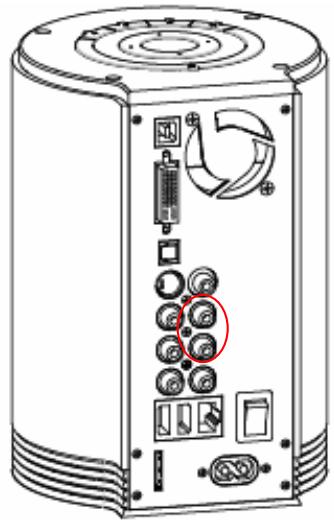
Connect the left(white) and right(red) sound output to the appropriate terminal of your TV or Hi-Fi system.
3.3.2 Connection to 5.1CH Amplifier (Digital)
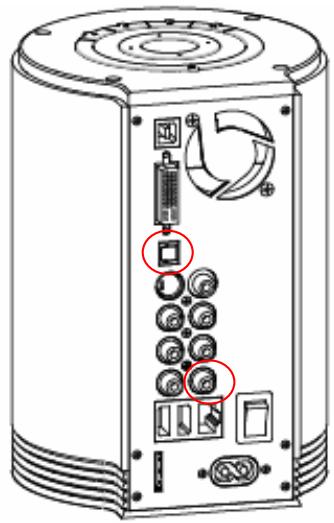
If you have a multi-channel decoder/amplifier with an optical/coaxial input, you can enjoy 5.1 CH high quality sound through the coaxial or optical cables.
The illustration on the left shows where to connect the coaxial cable. Optical cable connection is done in a similar method.
(These cables are not included in the package and must be purchased separately.)
CAUTION
If no sound is heard after connecting the Optical or Coaxial Cable, you have to change the audio setup of TViX to Digital.
3.4 LAN Connection
3.4.1 Connect PC via Network
< When connecting the computer directly to the TViX HD >
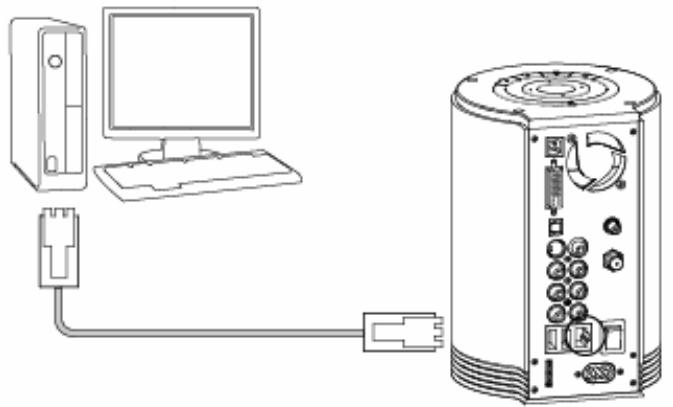
Connect the LAN cable to the LAN port of both the TViX HD and the PC.
TIPS
In this case, you generally use a LAN cross cable type.
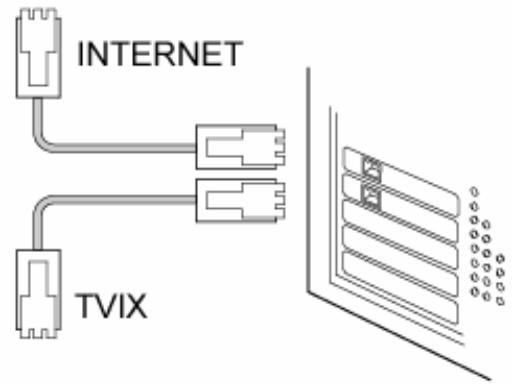
If the computer's LAN card was connected to an Internet line, you can install an additional LAN card to your PC and connect that LAN card to the TViX.
< When connecting with IP Router or Hub >
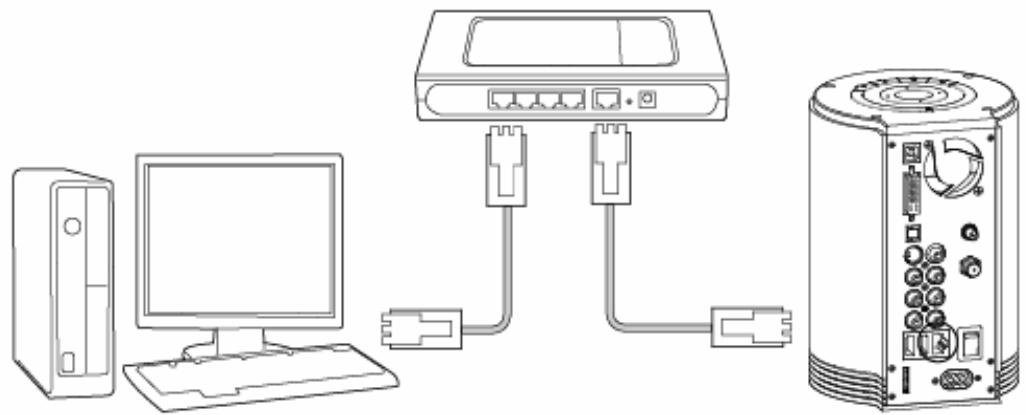
Connect the LAN cable to the LAN port for an IP Router or Hub.
TIPS
In this case, you generally have to use Direct LAN Cable type.
With NFS, M-5000U can play tp files on a PC flawlessly through LAN.
We recommend NFS connection than SAMBA. You need to install TViX Netshare program on a PC but the setting became much easier SAMBA method.
You can download NetShare installer from our website www(tvix.co.kr/Eng before you configure NFS network. Please refer to the Netshare program manual for detailed instructions.
http://www(tvix.co.kr/eng/support/Manual.aspx
You may skip the 3.4.2 section if you select to NFS network.
3.4.2 Set Network Configurations Under Windows XP (For SAMBA Mode)
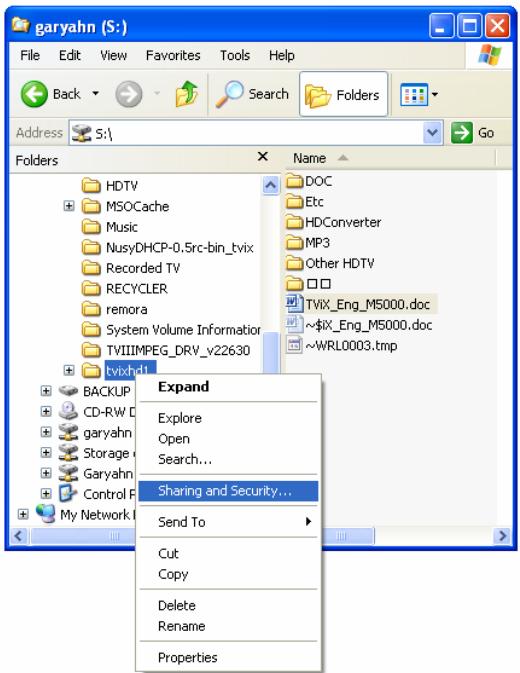
1) Select the folder you want to share. Right-click that folder and click 'Sharing and Security' in the popup menu.
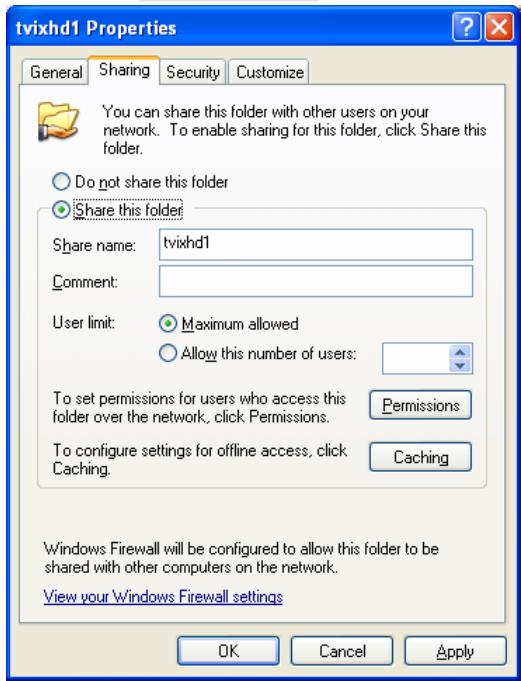
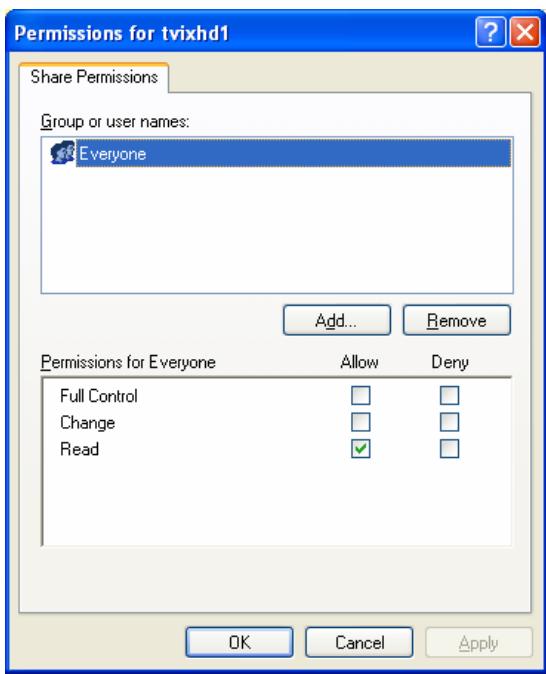
2) Check 'Share this folder' on the network and type in the share name 'tvixhd1 (this is the only available one at the moment).
3) Use 'Everyone' if 'Everyone' is displayed, otherwise you don't have to change anything. Also, add 'Everyone' to the security tab.
4) After that, the shared folder will be displayed like the
following picture.

TViXHD1
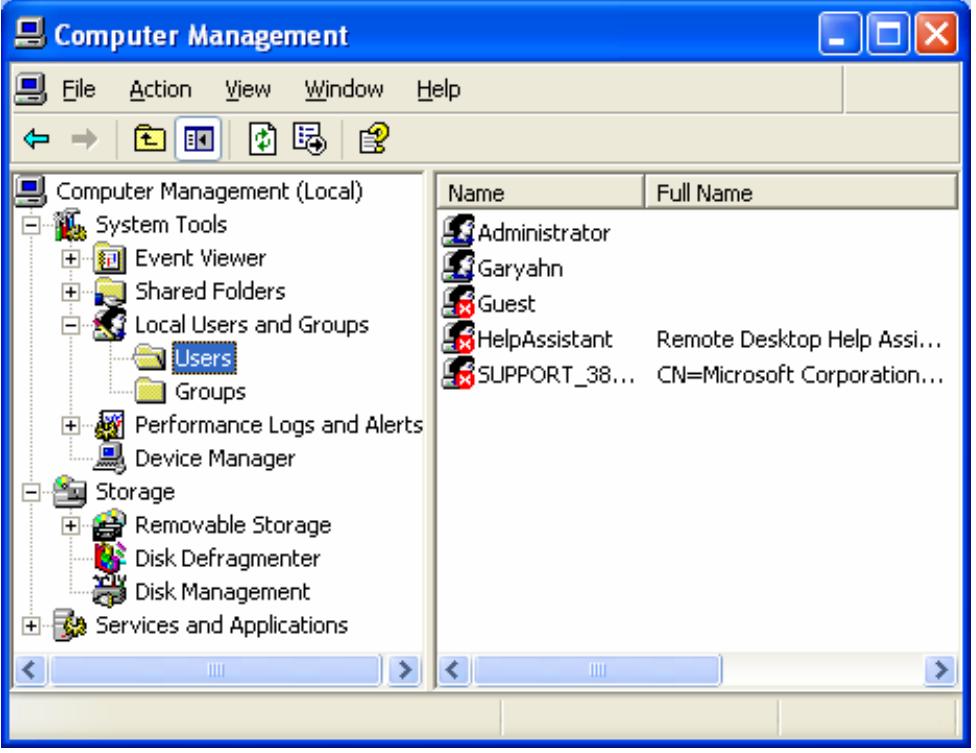
5) Move to 'Settings' > 'Control Panel' > 'Administrative Tools' > 'Computer Management' > 'Local Users and Groups' > 'Users', and double click 'Guest'.
CAUTION
This is for Windows XP Professional. Windows XP Home users cannot see this window. If you cannot find 'Administrative Tools' in the Control Panel, click "Switch to classic view" in the upper-left corner of the screen.
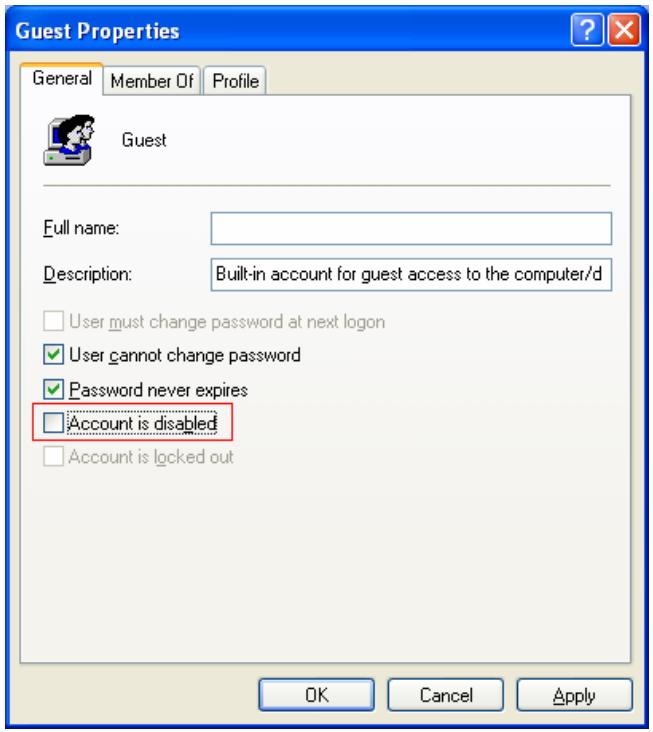
6) Uncheck 'Account is disabled'
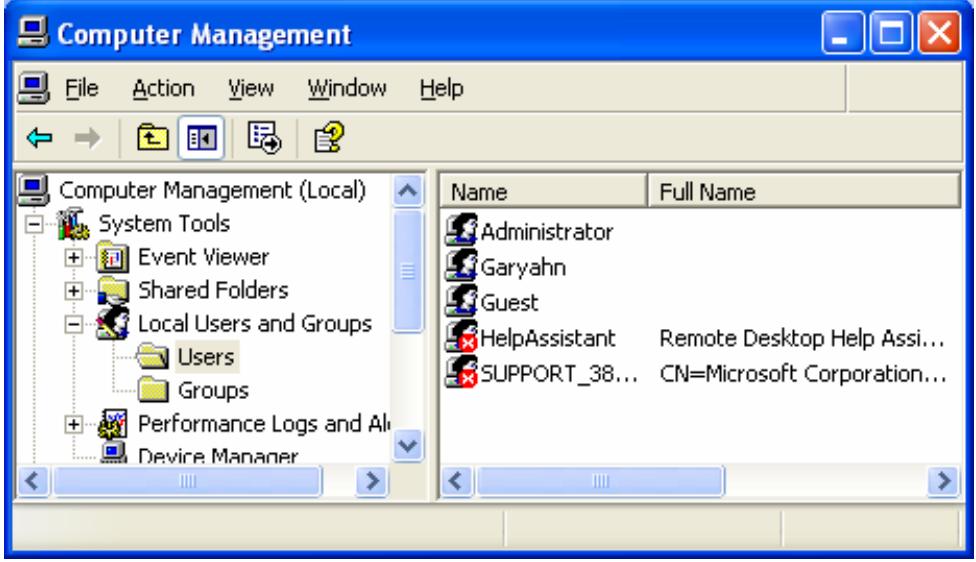
7) 'GUEST' must be shown as the following image (a red X mark should not be shown on 'Guest').
8) Move to 'Control Panel' > 'Network connections', and select 'Local area connections' properties by right clicking the mouse.
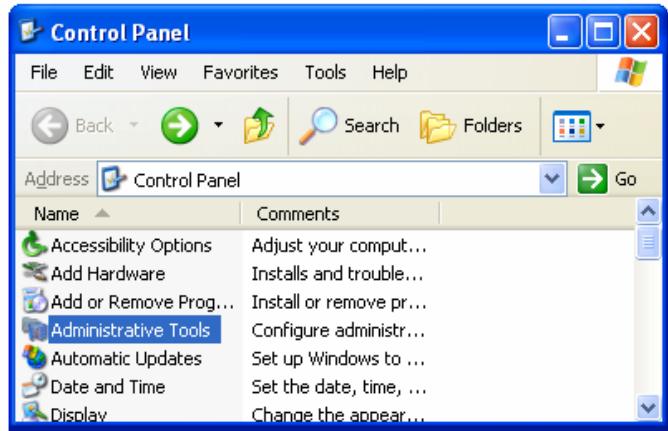
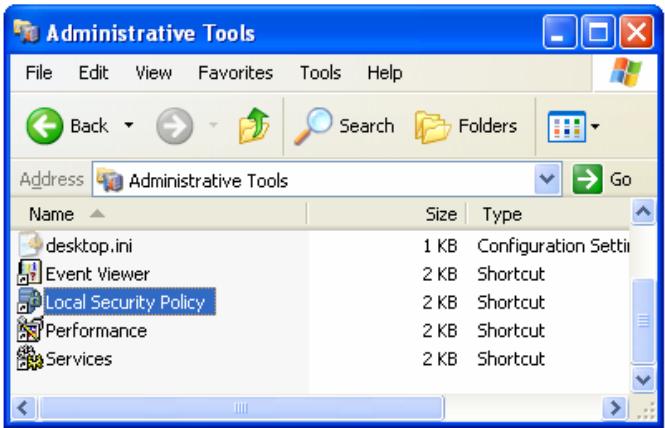
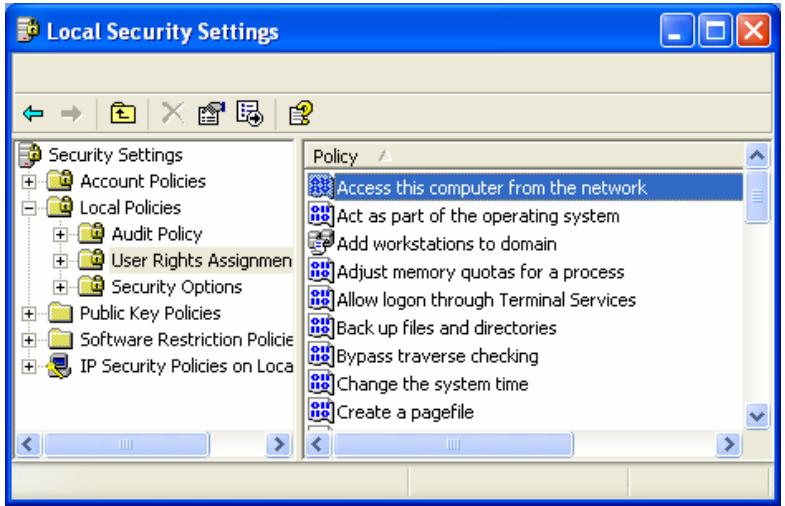
9) Remove "Guest" from the 'User Rights Assignment' > 'Deny access to this computer from the network' option.
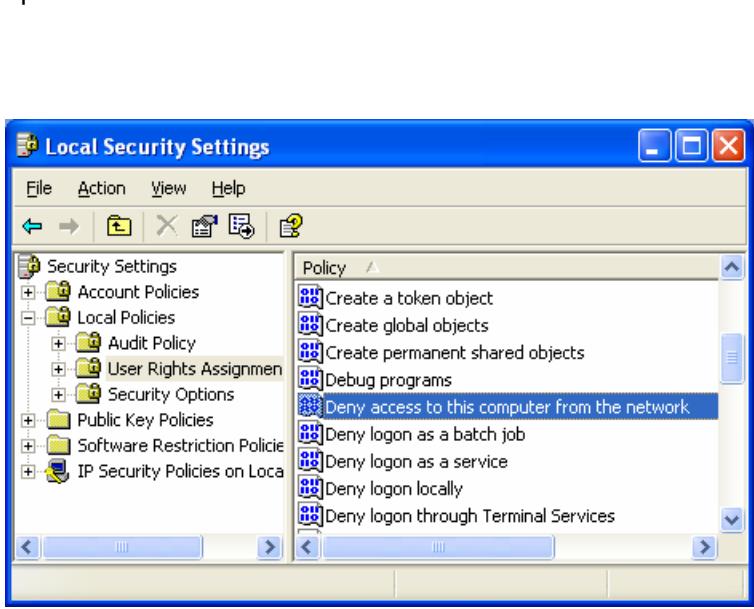
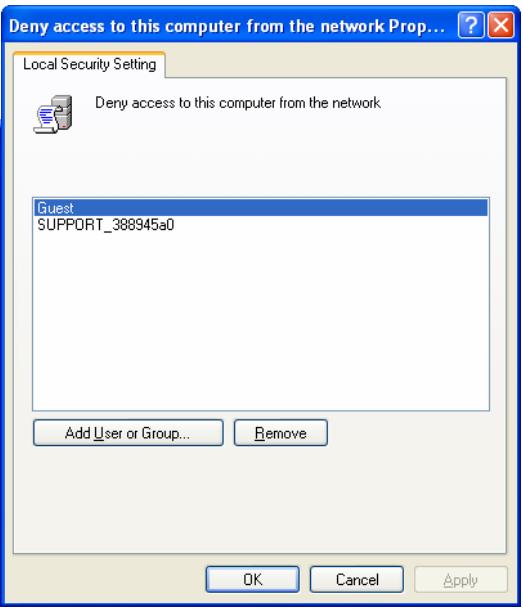
10) Move to 'Access this computer from the network', and then select 'Properties' by right clicking the mouse or double clicking it.
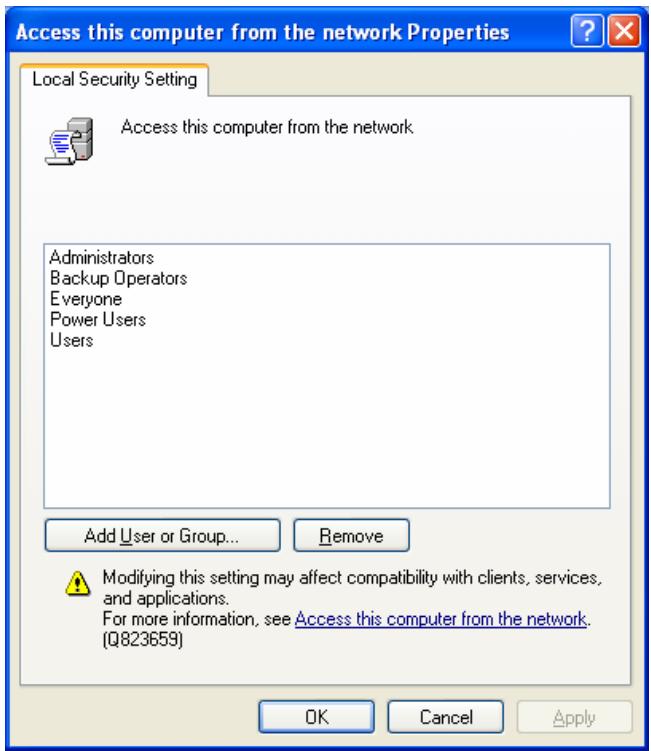
11) Click 'Add User or Group'
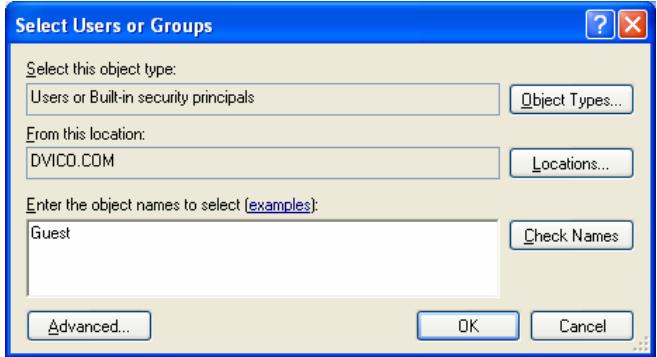
12) Type in "Guest" and then click the "OK" button.
13) Press OK, and Guest will be registered.

< When connecting Computer to TViX directly >
In this case, you have to use Cross LAN cable type generally..
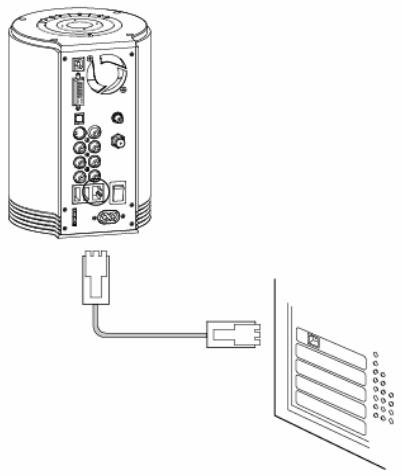
If the computer's LAN card was connected to Internet line, you can mount additional LAN card to your PC and connect that additional LAN card to TViX
- Move to 'Control Panel' > 'Network connections', and select 'Properties' properties by right click of mouse.
LAN or High-Speed Internet
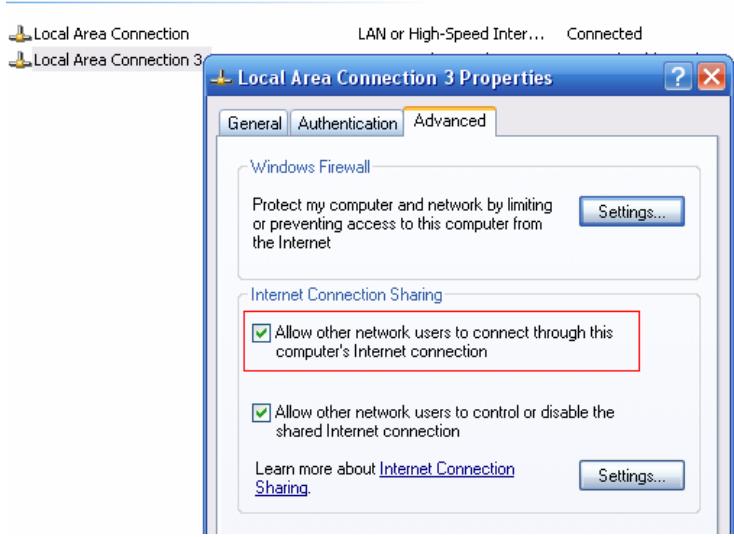
- When Windows 2000 or XP, Check "Allow other network users to connect through this computer's internet connection"
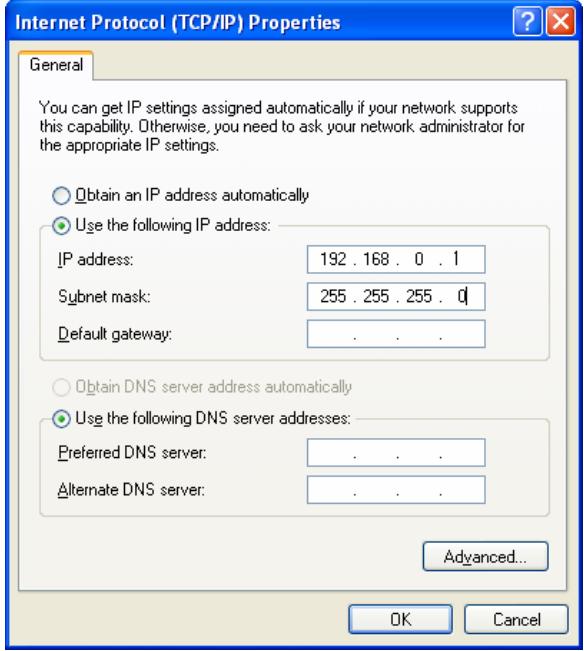
- Double click 'TCP/IP->LAN card' that you want to use on your computer. You must select the additional LAN card.
Check 'Specify an IP address', and write 'IP address' & 'Subnet mask' that you want to use.
Ex) IP address : 192.168.0.1 Subnet mask : 255.255.255.0
< When connecting with IP Router or Hub >
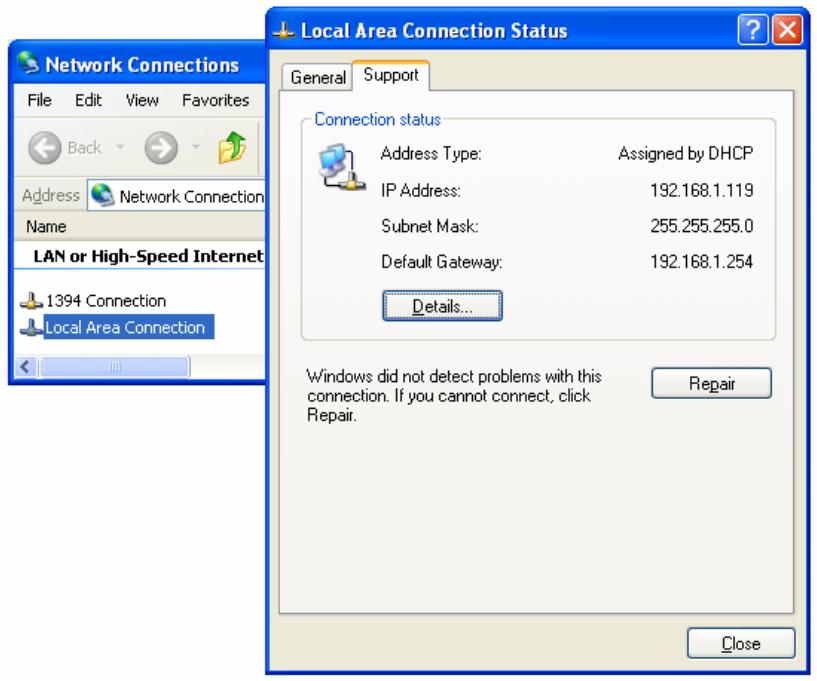
If you have already been provided a dynamic IP address from a DHCP Server or IP Router in your local area network, you don't need to write a static IP address. Use 'Obtain an IP address automatically on' or write an IP address & Subnet mask that the DHCP Server or the IP Router provides.
Select 'Control Panel' > 'Network Connections', and select 'Status' properties by right clicking the mouse. After clicking the Support tab, you should see an IP Address. (ex: 192.168.1.127)
< Disable Windows Firewall >
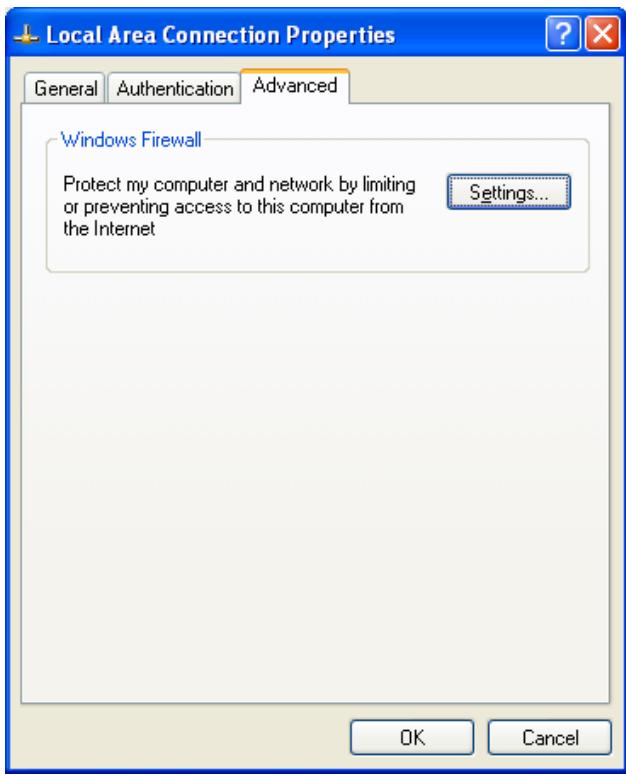
14) Move to 'Control Panel' > 'Network Connections', and select 'Properties' by right clicking the mouse. Click the 'Advanced' tab. Disable 'Internet Connection Firewall'.
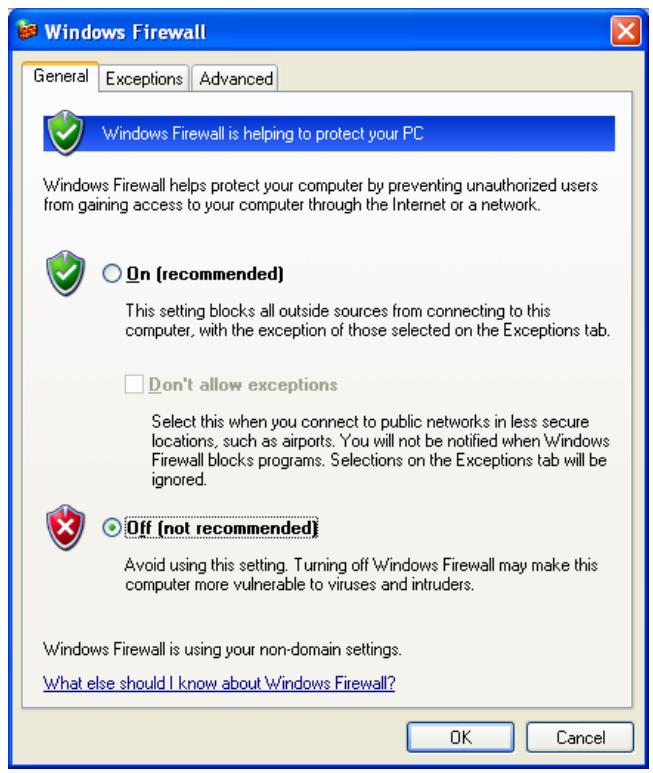
15) If you use service pack 2, click 'Settings' at 'Windows Firewall'.
16) Check 'Off' and then click 'OK'
3.4.3 Setting Network Configurations in TViX HD
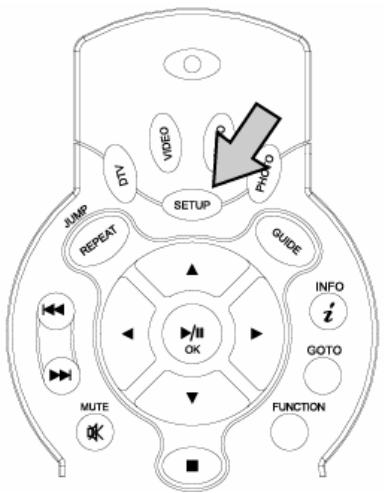
1) Press [SETUP] on the remote control to view the setup screen. On that screen, select MISC setting-Network disk and write the IP address in the Server IP. (ex: 172.28.1.70)
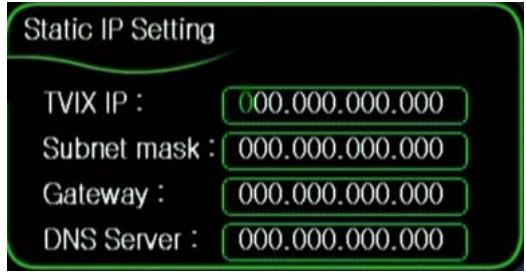
The default is DHCP and if you want to set Static IP, you can select to change Static IP on the IP setting.
If you used the DHCP you don't need to assign the IP address because it's assigned automatically.
2) If you cannot access via LAN with DHCP setting, we recommend to use the Static IP setting.
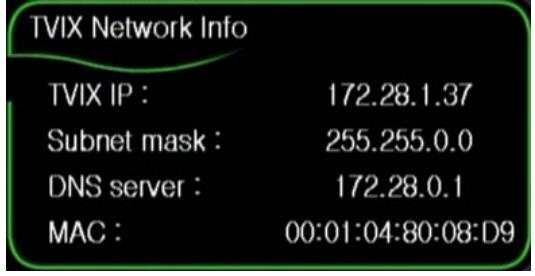
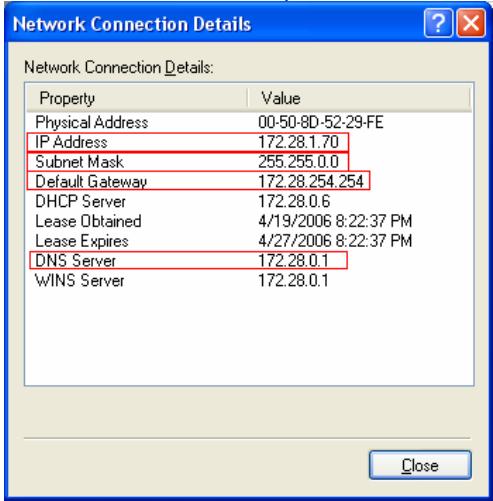
3) Select 'Control Panel > 'Network Connections', and select 'Status' properties by right clicking the mouse. After clicking the Support tab, press details, and you can see the Network connection details.
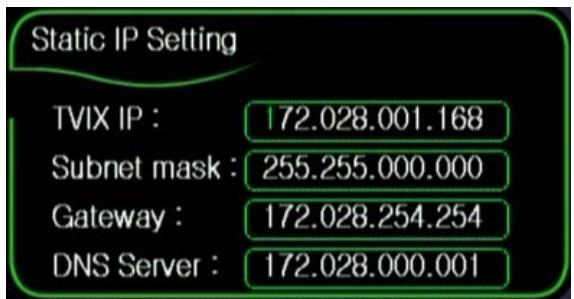
Write IP address, Subnet Mask, default gateway and DNS server.
You must write different IP address like below image. (ex: 172.28.1.70 → 172.28.1.168)
Forth address is different compare with PC's IP address.
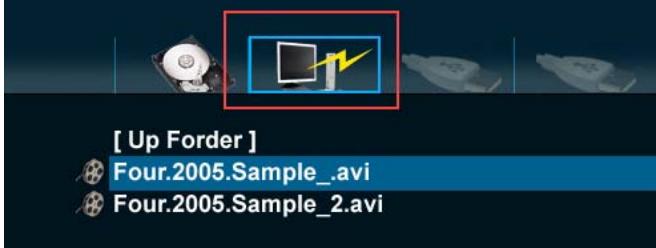
4) When the setting is successfully finished, you will be able to see the shared folder. Network Disk is supported up to 4 PC system. You can see the partition on the network icon like below image.
5) You may check for detailed usage at the TViX website (www.tvix.co.kr/Eng)
3.5 HDD Installation/Exchange
Warning: If you change the HDD of a TViX equipped with an HDD, the warranty will be voided.
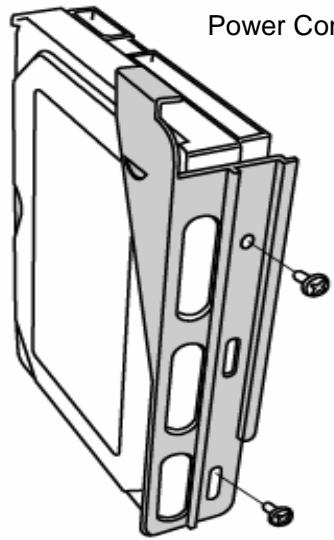
Power Connector
- Assembling the TViX HD is very easy. Just follow the instructions below:
Use a driver and screw the hard disk on to the guide board.
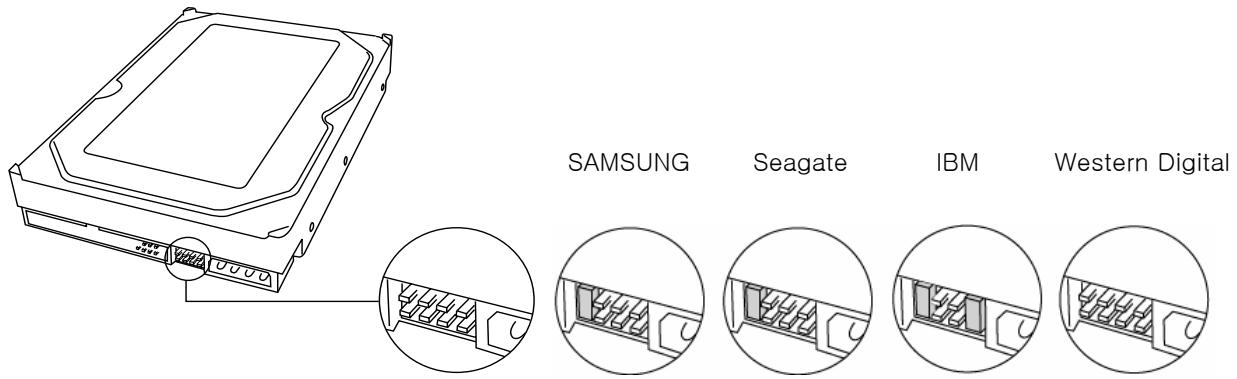
Set the jumper to 'Single Master'.
< Jumper Settings >
The 'Jumper Setting' differs according to the HDD manufacturers, so please refer to the instructions of the specific HDD provided by the HDD manufacturers.
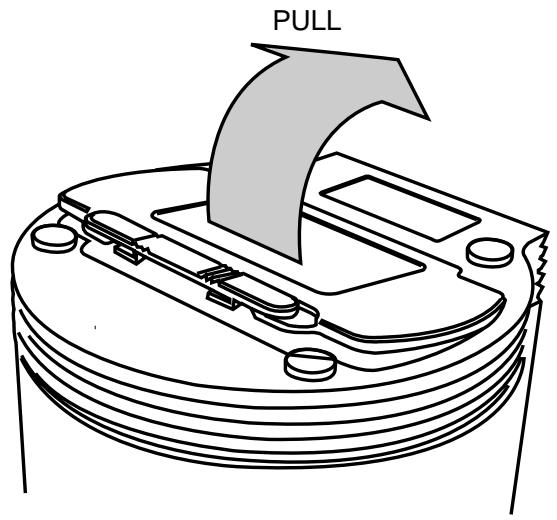
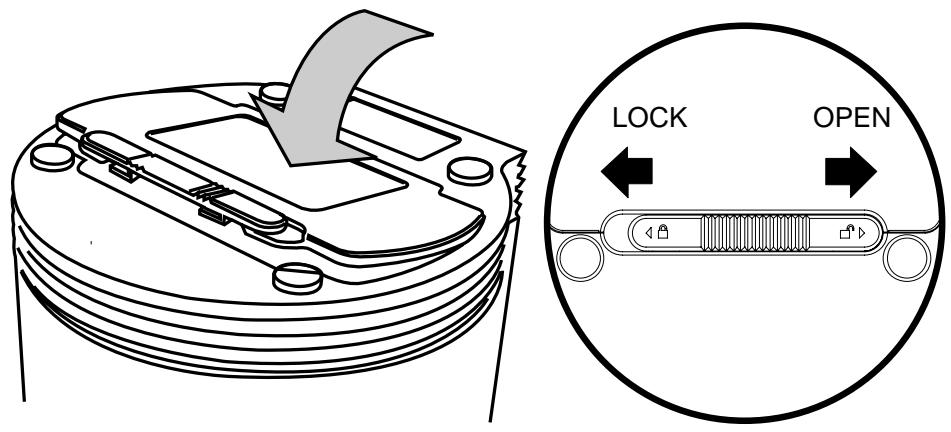
- Open the cover case in the direction of the arrow.
- Place the HDD in the TViX HD board.
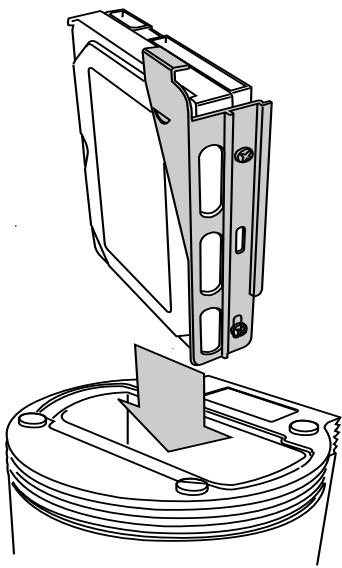
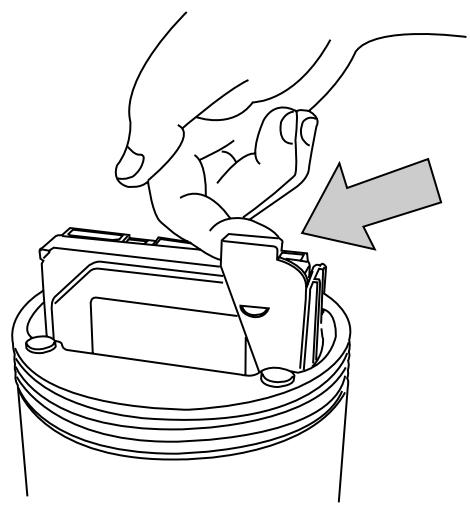
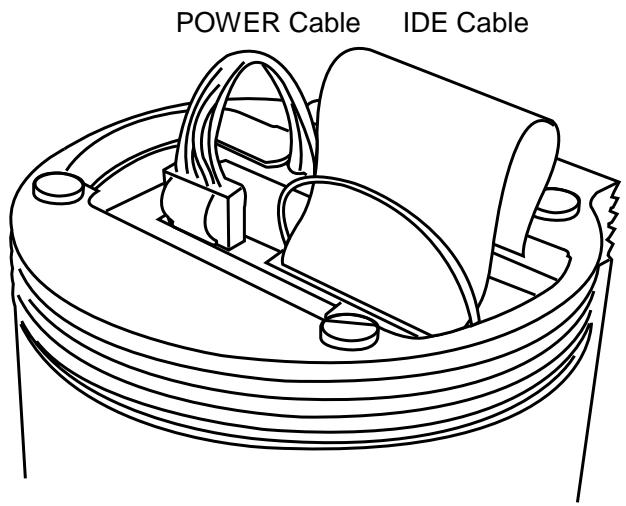
- Connect the power cable and the IDE cable. When inserting the HDD, take precautions to protect the IDE cable from being damaged.
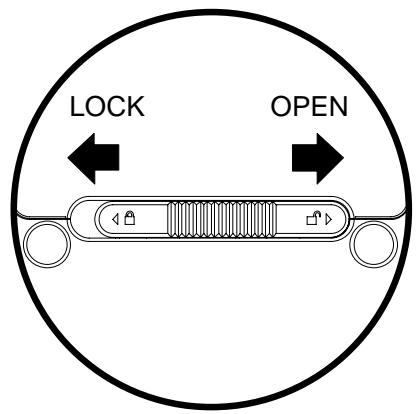
- Close the case by pushing the cover towards the direction of the arrow and then lock it.
4 TViX HD Setup Menu
4.1 Audio/Video Setting
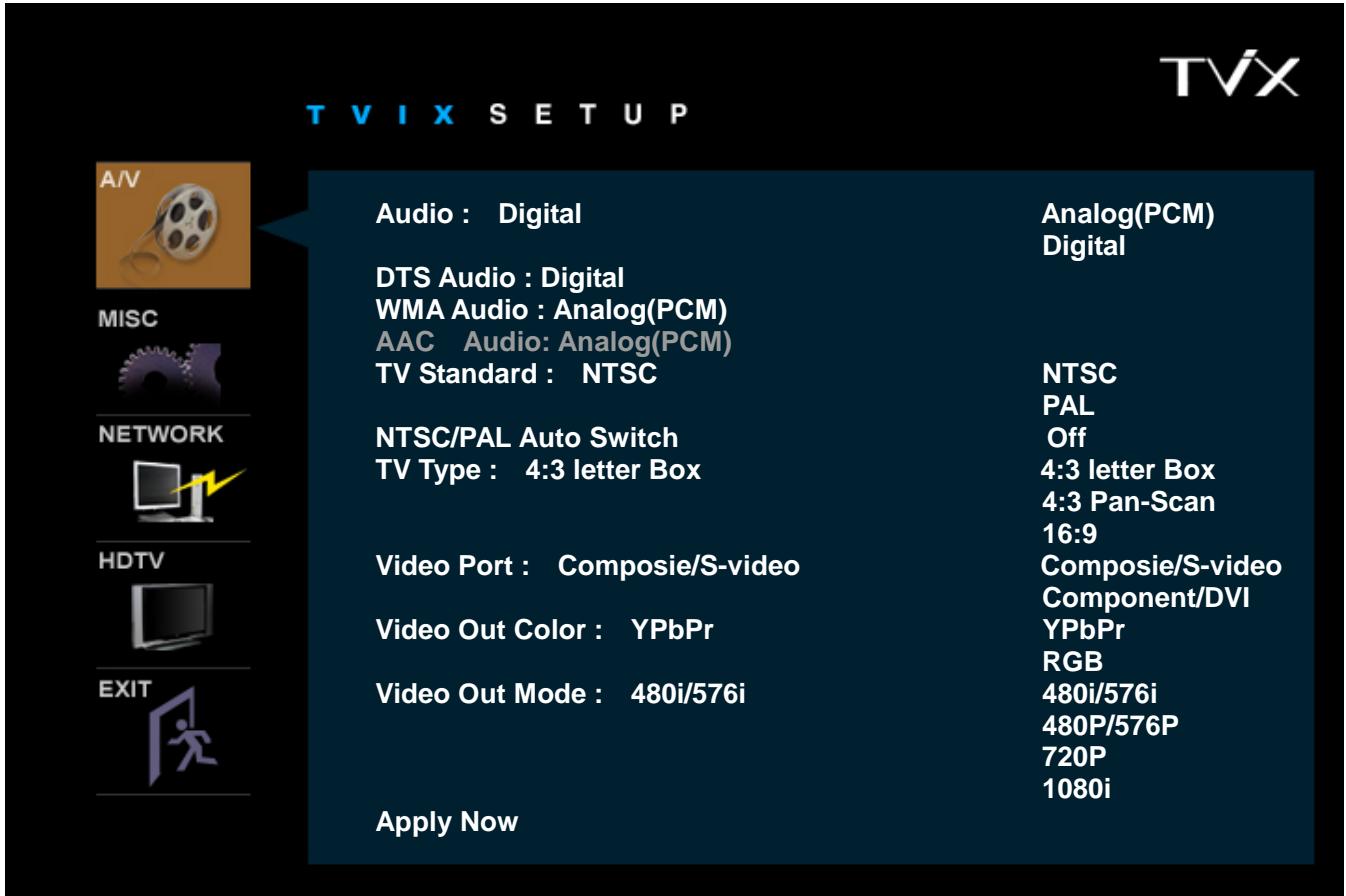
This section indicates the Audio/Video settings.
Setup password protection is available. You can set password to enter into setup menu. (on MISC menu inside SETUP). This will block children changing setup accidentally.
The password is 1111
-
Audio : You can set the mode of audio output by each audio codec used.
-
If you set Audio to Digital, you can set DTS and WMA to digital or analog.
-
Please set this according to the audio format your receiver supports.
-
Analog : Select this when you connect the audio with a stereo RCA cable (the RED and WHITE cable)
You can set the mode of audio output by each audio codec used. If you set Audio to Digital, you can set DTS and WMA to digital or analog. Please set this according to the audio format your receiver supports. - Digital : Select this when you connect the audio with an optical or coaxial cable for digital audio connection to the Decoder/Amplifier. There will be no analog audio out from the analog audio port of the TViX HD.
- TV Standard : The default video setting of the TViX HD is COMPOSITE (NTSC/S-VIDEO or PAL C/S-VIDEO). This is the most general setting and works with almost all TVs.
- NTSC/PAL Auto Switch : is used when the video out is changed according to the NTSC or PAL format.
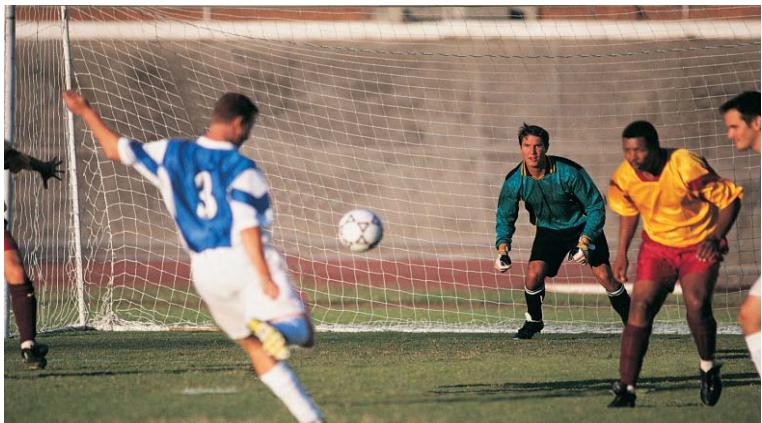
- TV Type : 4:3 Letter Box / 4:3 Pan & Scan for ordinary TVs / 16:9 for Wide TVs like HDTV or Plasma TV. If the ratio of the TV is 4:3, select the 4:3 letter box or 4:3 Pan & Scan. If the ratio is 16:9, select 16:9.
- The 4:3 Letter box can show the original ratio of the multimedia file in 16:9.
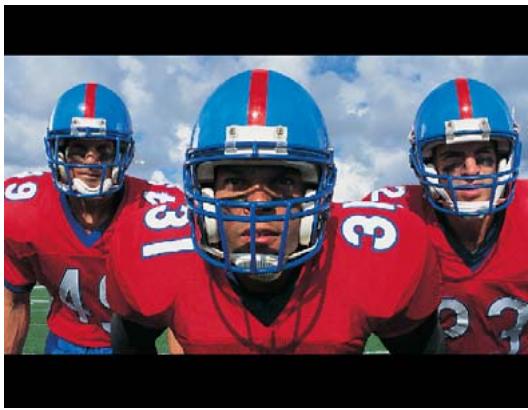
- The 4:3 Pan & Scan will adjust the image of the 16:9 multimedia file to the 4:3 of the TV screen by scaling the image.

- 16:9 can adjust any ratio of the multimedia file to the TV screen with the original image.
-
Video Port : If you fail to see the initial TViX HD screen after turning the unit and TV on, make sure you have chosen the right TV out option by repeatedly pressing the TV Out button on the remote control. NTSC C/YPbPr(480i), PAL C/YPbPr(576i) is a special case. Select these settings if your TV is connected to TViX HD with a component output.
-
Video Out Mode : Select this when you connect the video through a component (YPbPr) cable. You can select the output resolution among 480P/720P/1080i. Setting it to 1080i will work on all HD grade TVs.
YPbPr : 480i/576i, 480P/576P, 720P, 1080I,1080P(DVI)
RGB(DSUB) : 480P/576P, 720P, 1080I,1080P(DVI),640480, 800600, 1024768, 12801024
- Apply Now : After configuration, please press 'Apply Now' to save the Video out state.

If you want to exit the Setting, Select the EXIT button( ) and then press OK on the remote control.
4.2 MISC Setting
This section indicates the MISC settings.
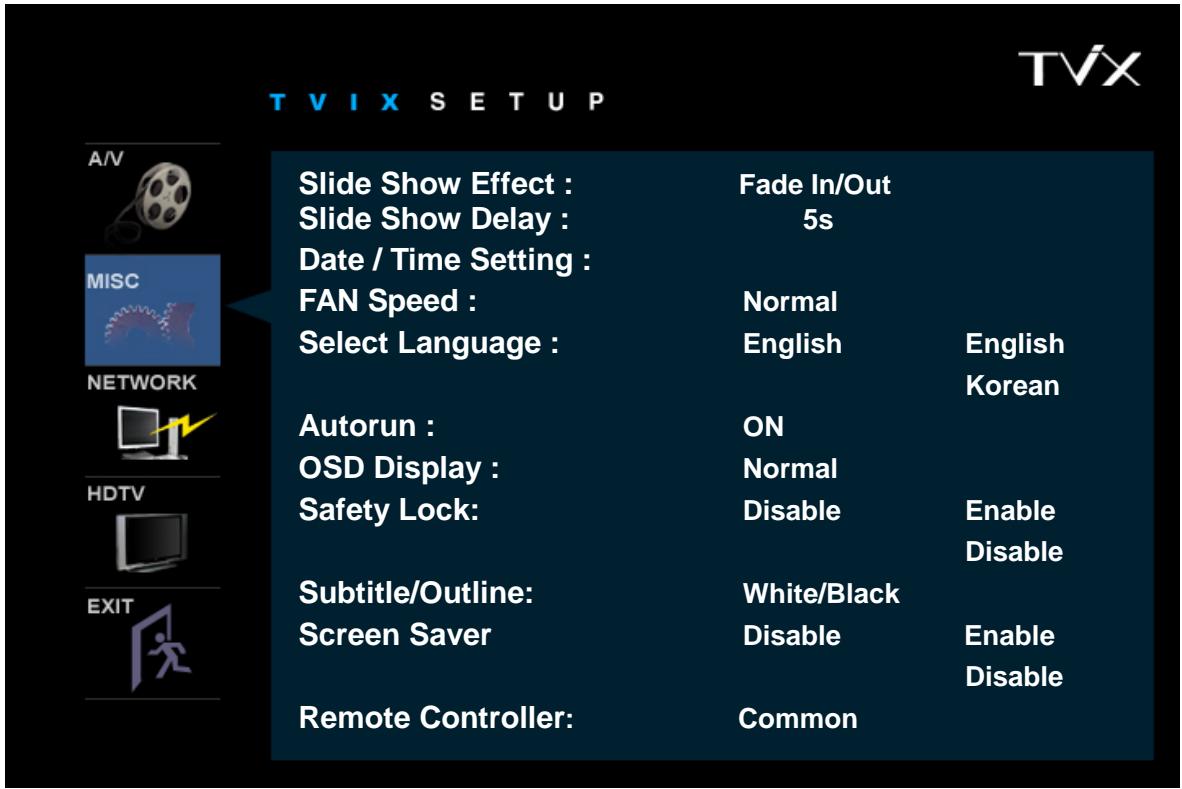
- Slideshow Effect : This is used when playing background music while watching picture slideshows.
- Slideshow Delay : Set the slide show time interval (0 sec – 60 sec)
- Date / Time Setting : Adjust the clock on the VFD by using the arrow and numeric keys.

- FAN Speed : Select your Fan Speed. We recommend the Normal setting.
- Select Language : Select your language preference.
- Autorun : You can listen to music.audio files) without display(TV). If you select “random”, it plays randomly. (Off-on-Random-Repeat-Random/Repeat)
- OSD Display : Select the type of OSD display. We recommend the Normal mode.
- Safety Lock : is used the password("1111") when you run the SETUP menu.
- Subtitle/Outline: Change the color of the subtitle and its outline.
- Screen Saver : If there is tvix_ss.jpg on the root directory, you can see this image(160*160 pixel) after 2~3 minutes. When the pause status or playback of audio(without slide show), Screen saver will work.
- Remote Controller : You can select your remote type. We recommend the common setting. If there is a collusion between other device and TViX remote, you’d better A or B type referring to image.
4.3 Network Setting
This section indicates the Network settings.
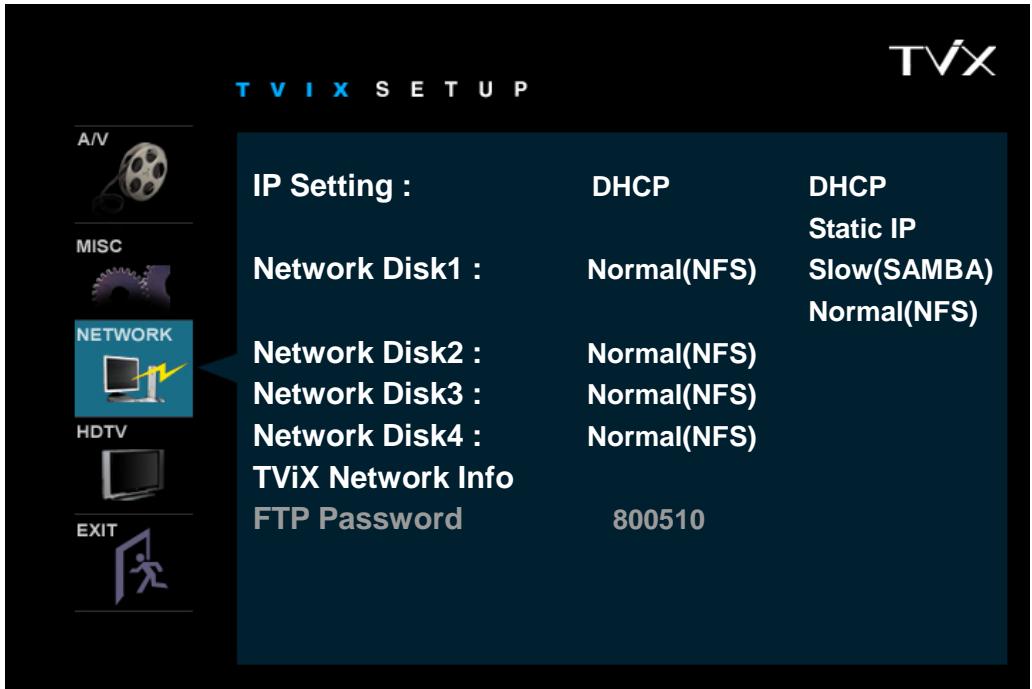
- IP setting: Default setting is DHCP. If you cannot access via LAN with DHCP setting, use the Static IP setting. Please refer to Setting Network Configurations in TViX HD.
- Network Disk : Write the PC's IP address in the Server IP. (ex: 192.168.001.128)
Supports up to 4 Network disk server.
There are two network method in TViX5000 model. One is SAMBA mode another is NFS mode.
- SAMBA mode: You can play the file via network without special program, but the speed is lower than NFS mode.
- NFS mode: You must install the TViX NetShare utility in to your PC, but you can play the TP or DVD jukebox without stutter.
We recommend to share the NTFS file system. FAT32 file system does not contain enough information to create a lasting file name, so TViX doesn't load the file after changing the file name.
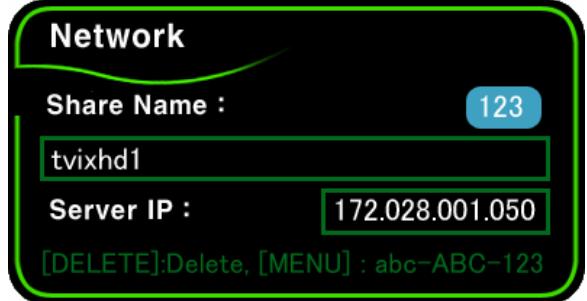
For the detail instruction, you can download the NetShare installer and NetShare manual from our homepage.
(www.TViX.co.kr/Eng)
When several tvix is accessed to one PC, You must set to SAMBA setting.
-
TViX Network Info : You can see the information of TViX's Network.
-
FTP Password : If you want to use FTP function, you must use this password.
For the detail instruction, please refer to following FAQ. - http://www.tvix.co.kr/eng/faq.
** Number 1 key is changed as @ : / - when this key is pressed.
5 Easy Usage of TViX HD
5.1 Play Video Files
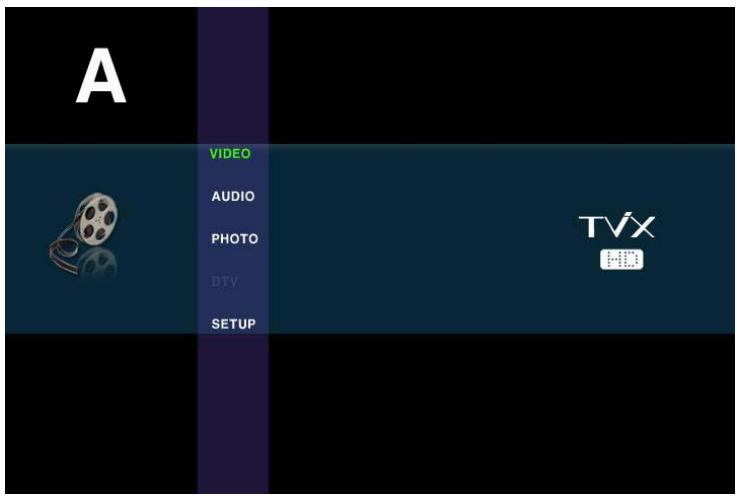
When installation is successfully finished, you will see screen A.
You may copy a video file into the VIDEO folder in advance.
- SETUP,VIDEO,AUDIO,PHOTO,HDTV icons.
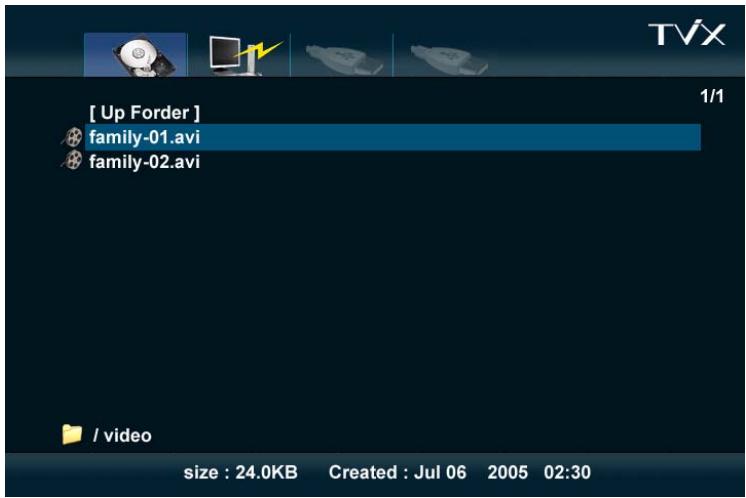
- Select the Video icon by using the Left/Right button. If you want to change the partition of the HDD, press the Jump/Repeat button.
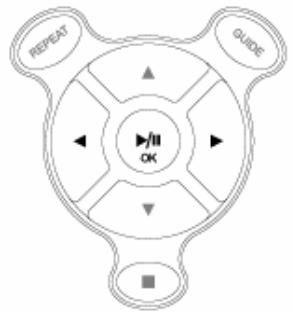
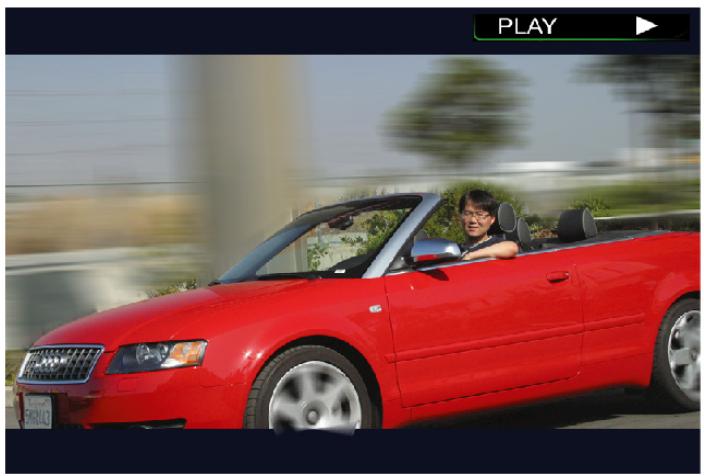
- After selecting the icon, press the OK button.
- You will see 2 files in the Video folder.
- Using the up/down button, select the Video file.
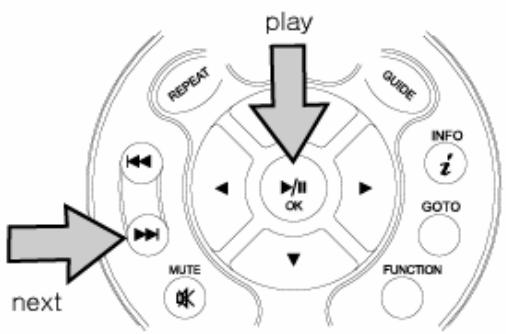
By pressing the OK button, you will be able to play the video file.
TIPS
If you want to play the next video, press the NEXT (>>|) button.
5.2 Play Audio Files
You may copy an audio file into the AUDIO folder in advance and play music files.
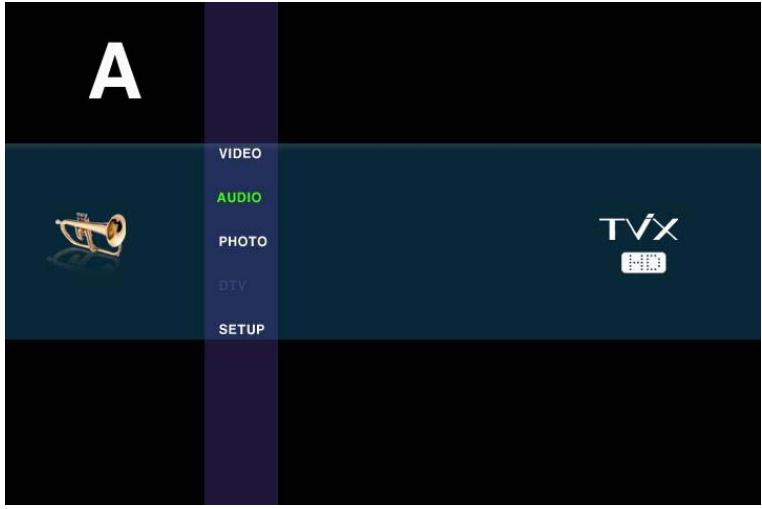
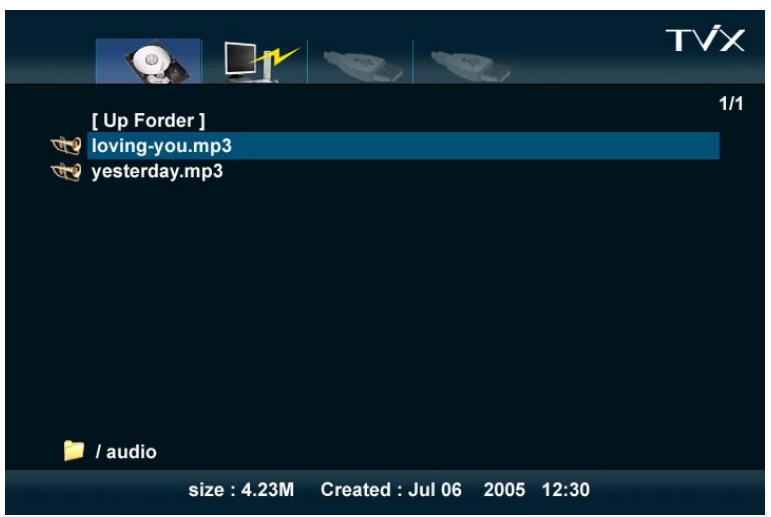
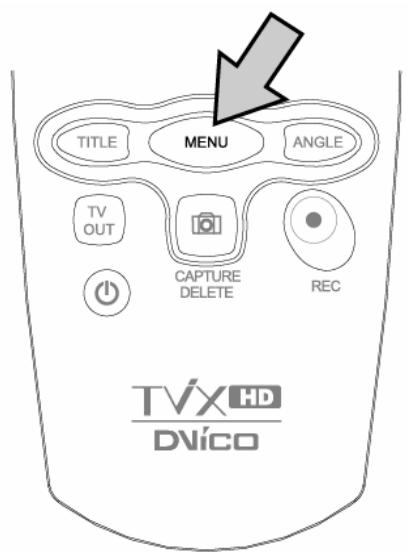
- If you cannot see screen A, press the MENU button on the remote control.
- Select the Audio icon on screen A and press the OK button.
- You will see the audio file that you just copied.
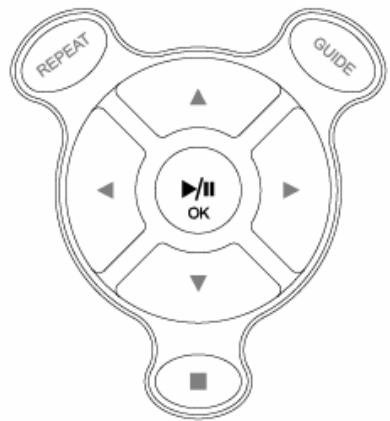
- Select the audio file using the up/down button. Then by pressing the OK button, you can easily play the audio file.
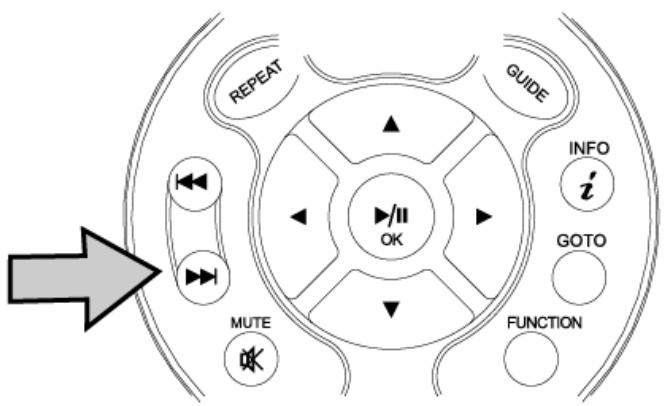
TIPS If you want to play the next video, press the NEXT (>>|) button.
5.3 Play Image Files
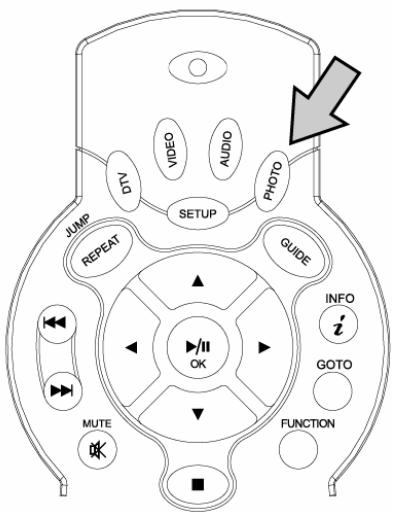
You may copy image files into the PHOTO folder in advance and play the image or photo files.
- You may press the PHOTO button on the remote control without selecting from the menu screen.
- Press the PHOTO button.
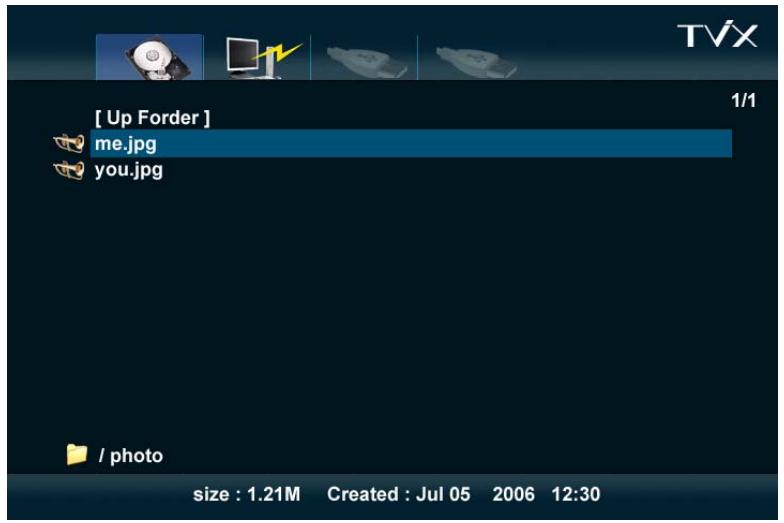
- You can see the image files that you just copied.
- Select the image files using the up/down button. By pressing the OK button, you can easily play the image files.
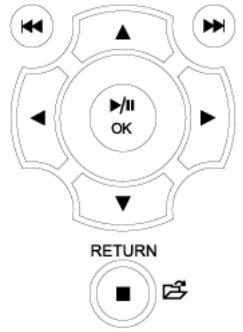
- If you want to play the next video, press the NEXT (>>|) button.
TIPS
You can play the Video and Audio as well as the Photos with the remote control.
If you connect the LAN cable or external USB, Network or USB icon is enabled.
We're supporting up to 4 hard disk partition, 4 network PC, 4 USB1 partition and 4 USB2 partition.

6 Using the remote control
6.1 Basic Functions
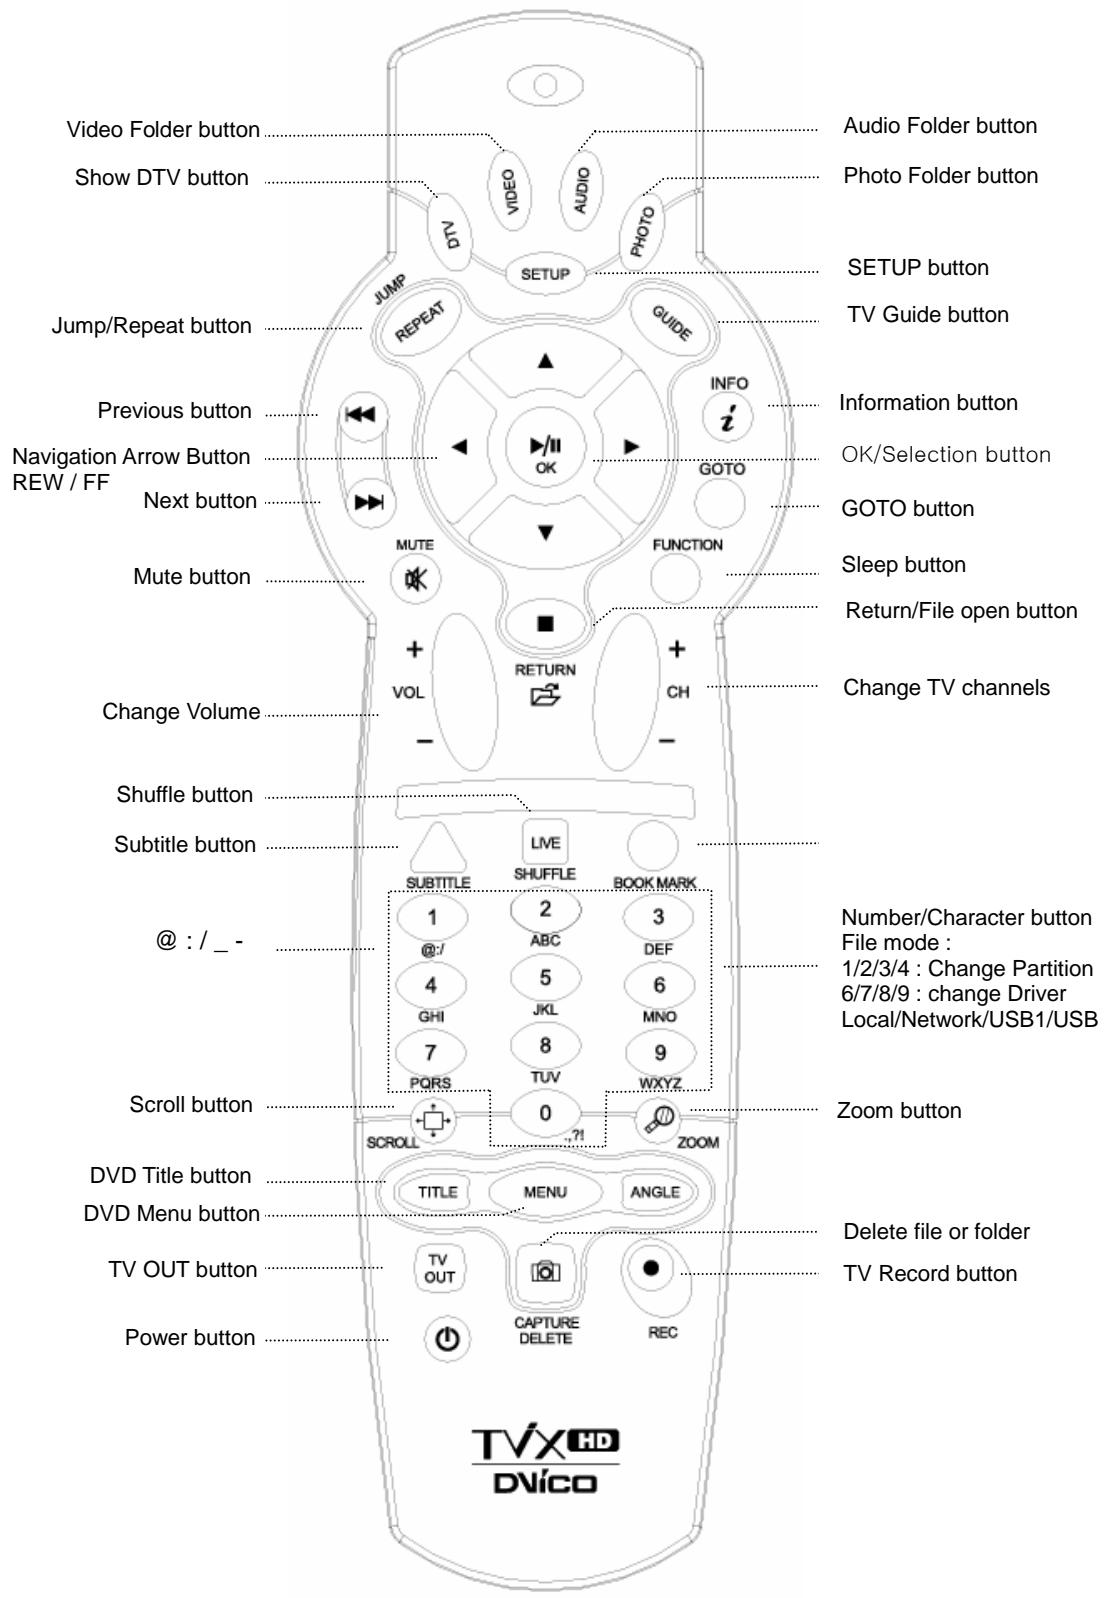
When the File list menu, 1 / 2 / 3 / 4 : used to change the partition (partition 1/ partition 2/ partition 3/ partition 4)
6/7/8/9 : used to change the Drive (Local/Network/Usb1/Usb2)
< Changing Batteries>
- Use new batteries (2 AA size batteries are included in the package).
6.2 Descriptions of Each Buttons
The playback of multimedia files.
Basically you can choose the file you want and press the OK button.
For playback of DVD files copied to the HDD, please locate the cursor to VIDEO_TS.IFO file and press OK.
You can do a full DVD navigation like you would do with a DVD player.
6.2.1 Video Playback
When you press the Video button on the remote control, only the Video folder will show on the TViX HD. This only applies to the active partition if you have more than one partition. When you press the JUMP/REPEAT button on the remote control, you can select another input source.
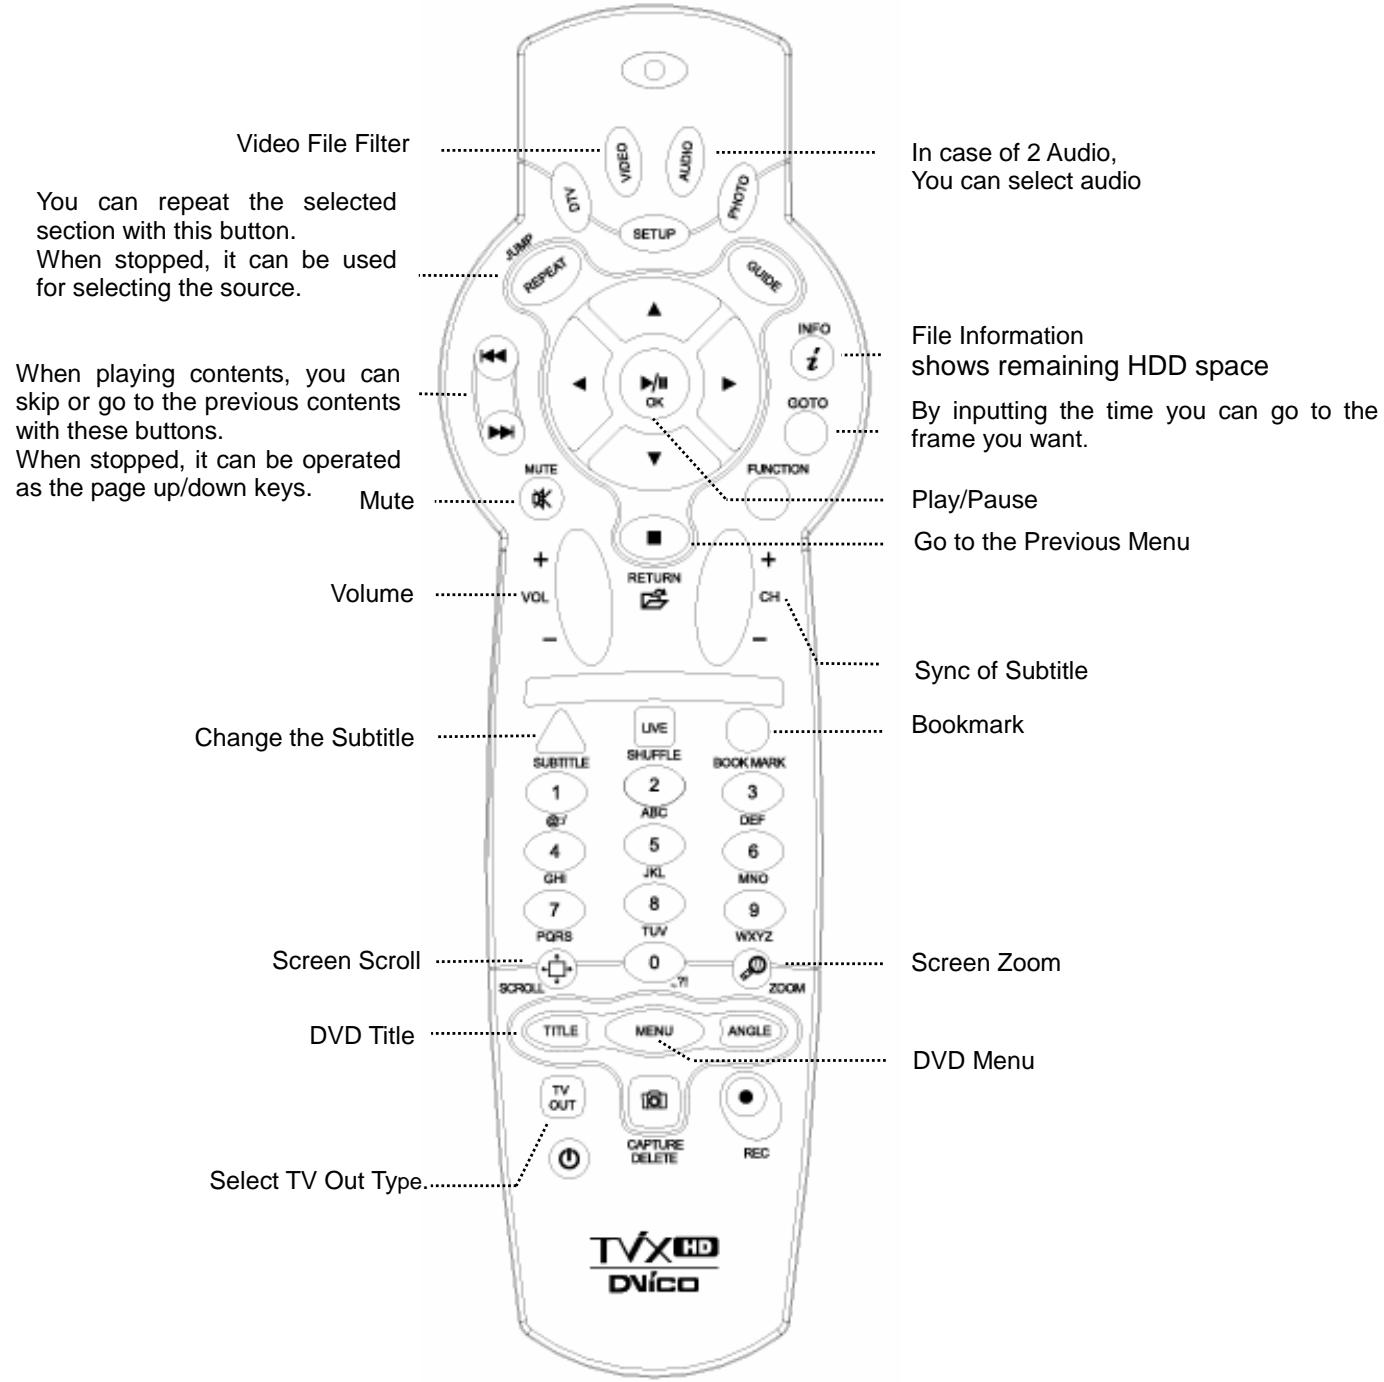
When the Play menu, you can configure the sleep time 30->60->90->120->150->180 using the Function Key. SLEEP ON will blink for 30 second before turning off.
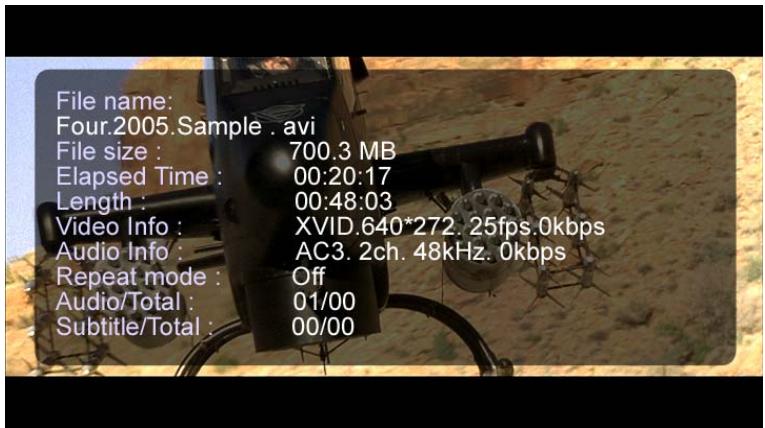
- INFO Button :
First Press - Shows information of the contents.
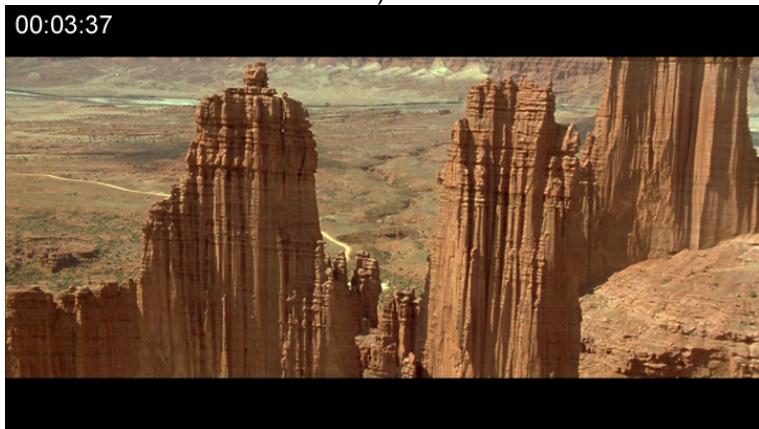
- Second Press - Shows the elapsed time (the progress bar is displayed on the upper left hand corner of the screen).
Third Press - Show remaining time.
- Forth Press - INFO off
- Pressing Info button while you are not playing files shows remaining HDD space.
- SUBTITLE Button :
Supports SMI Multi-subtitle control with the Subtitle button.
- First Press : Shows the Subtitle OSD. You can change the subtitle size using the OK button. If you press UP/Down button, you can change the position of subtitle.
- Subtitle color or outline is configurable on the SETUP menu.
Supports .SUB ( bitmap) + .idx subtitle files
PAL format .SUB subtitles are not supported in this version.
- You can go to subtitle file selection mode by pressing TITLE button (next to MENU) on a remote controller. You can navigate folders and files and press OK button on a subtitle file you want.
- You can change the subtitle sync using CH +/-
-
ZOOM Button :
-
First Press - Zoom, you can change the size by pressing the arrow buttons.
Second Press - Full screen
Third Press - PAN&SCAN full screen
Fourth Press-Zoom Off -
BOOKMARK: If you stop the movie, the stop position will be automatically saved and you can resume it later anytime by pressing the "bookmark" button on the remote control.
-
SETUP Button
-
Picture adjustment. Contrast Brightness Saturation.
-
DELETE Button : is used to delete the file or folder from the TViX Local hard disk.
If you configure the remote controller lock up option on the SETUP menu, You must press the password ("1111") if you want to delete the file.
When you do delete the file or folder, you must play the check disk periodically.
TViX player is shown the disk check message if you need to check the hard disk..
http://www(tvix.co.kr/ENG/FAQ/FAQM5000U.aspx?act=RD&id=130&pg=0&CATID=3&SCATID=2
-
Sleep function has been implemented.
-
You can set sleep time by pressing function key repeatedly on a remote controller.
- SLEEP ON will blink for 30 second before turning off
The present playing time will be displayed with the GOTO function.
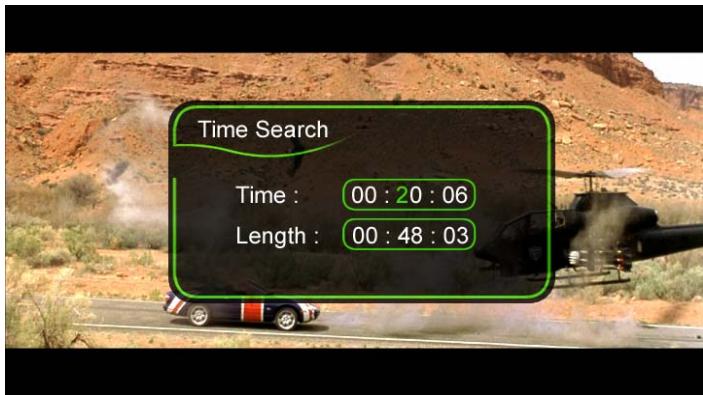
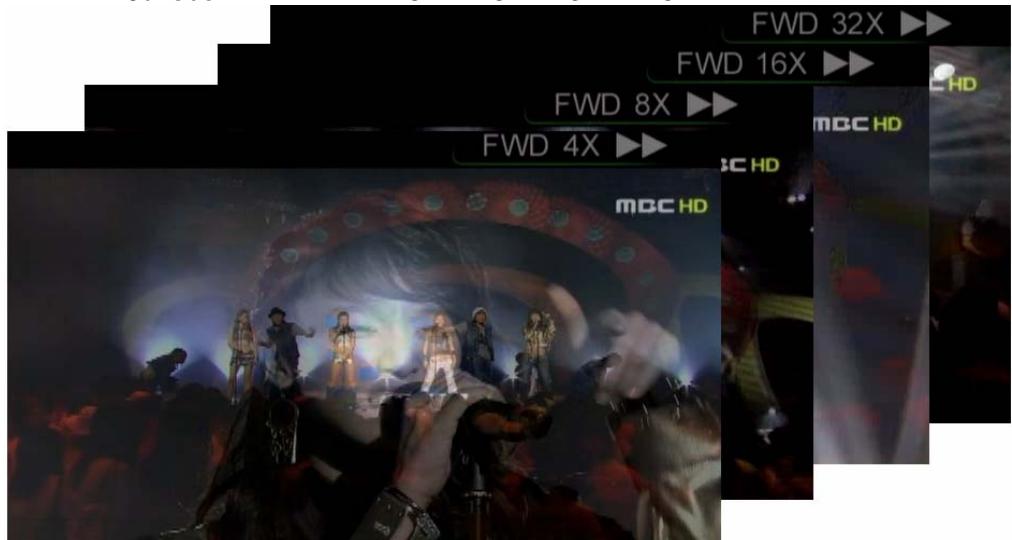
FF/REW Button
AVI: 4X 8X 16X 32X.
DVD Jukebox: 2X 4X 8X 16X 32X 64X .
- Press theVIDEO button and you can filter video files among those stored in the TViX HD.
TIPS
- Improved to save up to eight bookmarks on eight individual files. (It cannot save eight bookmarks on a single file.)
- Recognizes AVI, MPG, VOB, CAT, M2P video files only.
- A video file where the folder is setup with a password cannot be saved.
- When replaying the same file, only the last play position will be saved (thus, bookmarked).
- Among the bookmark list, a file deleted from the hard disk will be automatically deleted from the bookmark list as well.
- Cannot save the bookmark list when in USB HOST or LAN mode.
- OK Button - When a movie is playing it operates as a play button. In the menu screen it operates as a select button.
PAGE-DOWN - Go to the next chapter.
- PAGE-UP - Go to the previous chapter.
- AUDIO Button - You can change the audio. (International dubbing, DOLBY, 2CH, 5.1CH, DTS etc.)
- SUBTITLE - Shows the subtitle menu.
- MENU Button - Shows the DVD menu screen.
- TITLE Button - Shows the DVD title menu.
- ANGLE Button - If the DVD title has an angle function, you can change the angle.
GOTO Button - You can choose the time, chapter and title. After choosing you can play directly.
- Number + OK - Play the chapter of the number directly.
** The operation of “PICTURE” and “VOLUME UP/DOWN” is the same for Video operation.
6.2.2 Audio Playback
When you press the AUDIO button on the remote control, only the AUDIO folder shows in the TViX HD. It applies only to the active partition if you have more than one partition.
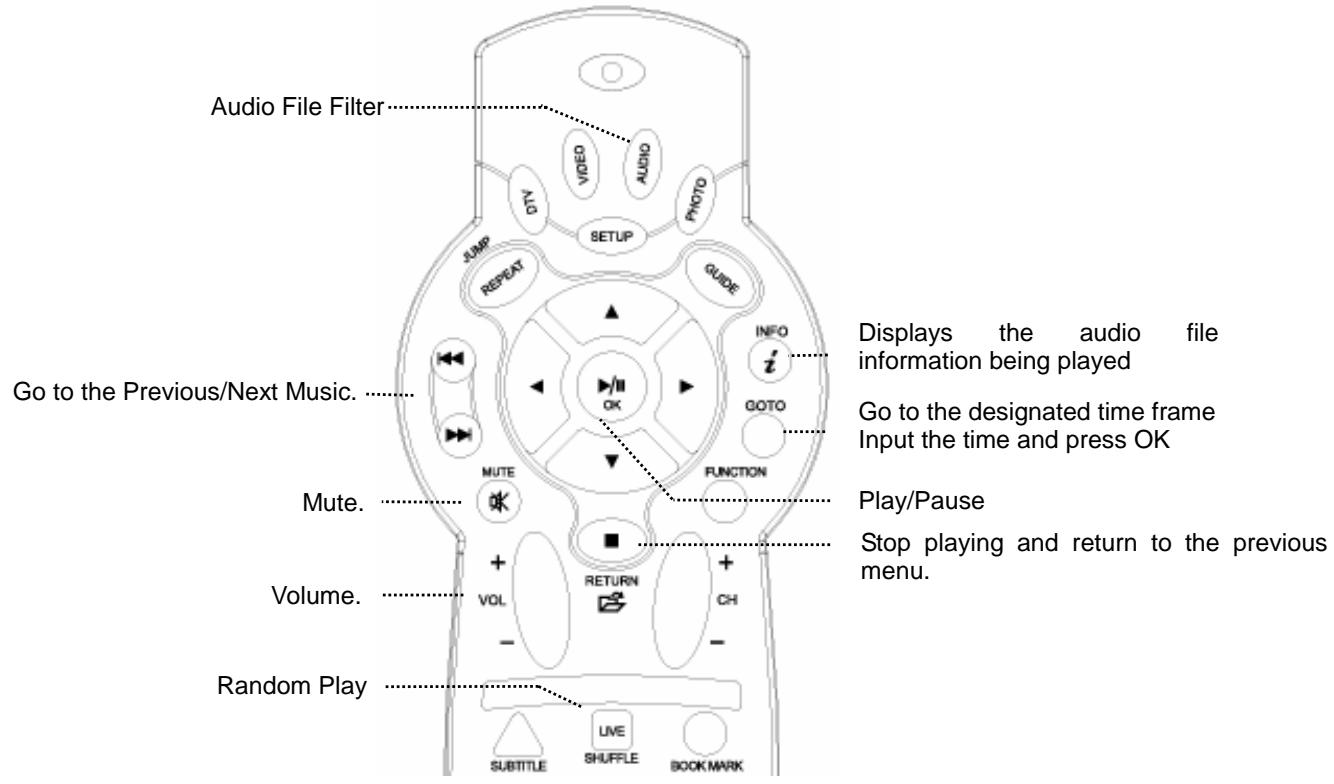
** Some functions require firmware updates first.
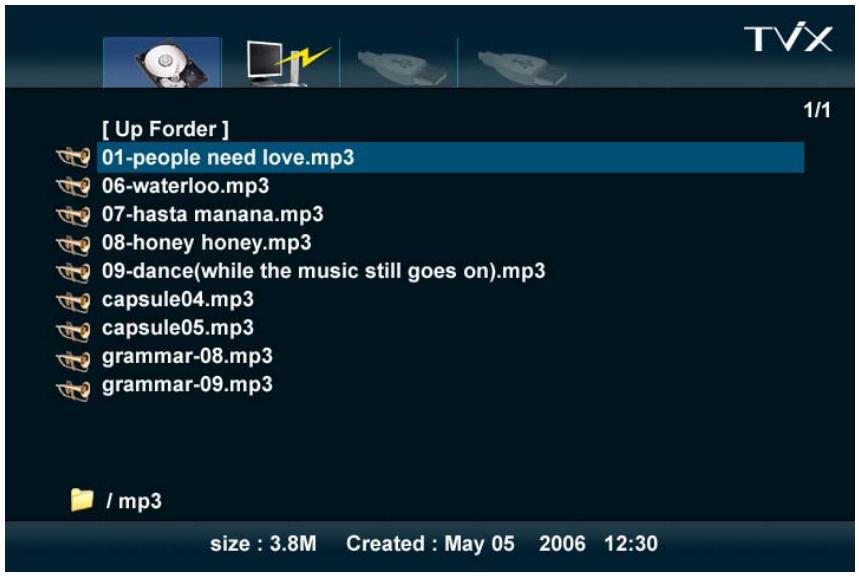
- Press the AUDIO button and you can filter video files only among the files stored in the TViX HD. It applies only to the active partition if you have more than one partition.
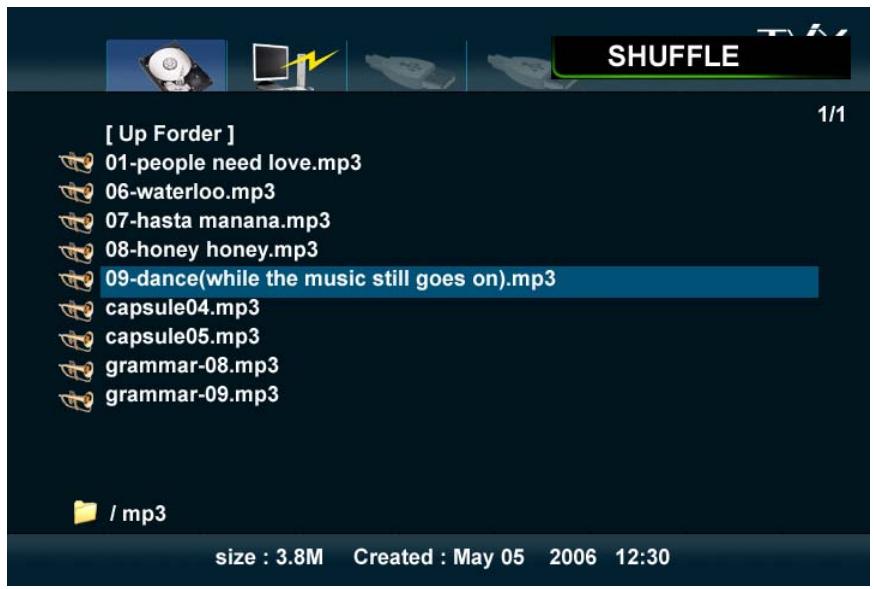
Shuffle Function (Random Playback)
- Press the Shuffle button to play the files of the present directory randomly.
- Press the Shuffle button again to disable the shuffle mode.
Supports 10 Sec function when playing WMA, WAV files. 10 sec FF/REW function is available while playing audio files.
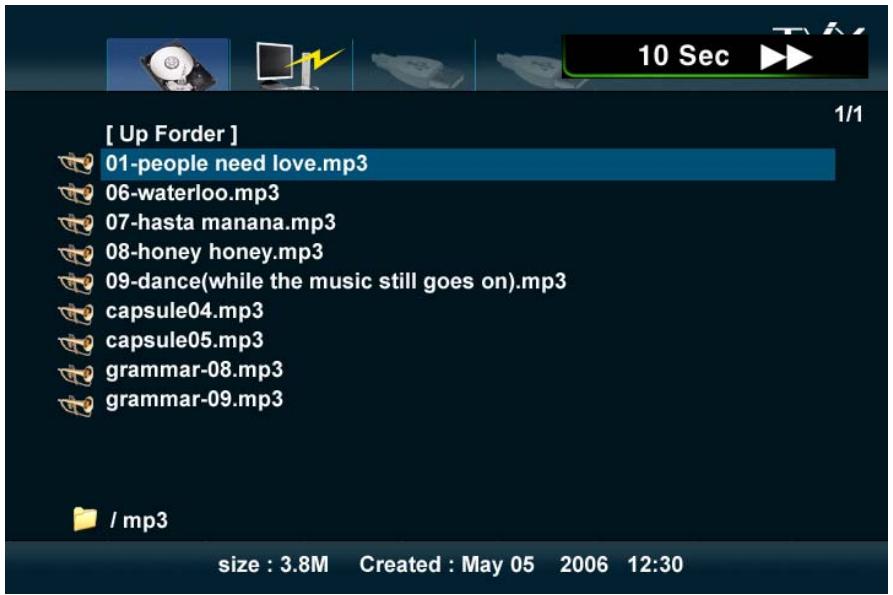
Supports Lyric Files (.lrc) If the file name of a music file and .lrc file are the same, the lyrics will be displayed automatically.
Supports ID3 TAG (ID3V1) when playing MP3 files - Press the INFO button to view the ID3 TAG (ID3V1). - You can see additional information recorded on the MP3 files, such as the artist, album etc. - OGG also displays basic Tag information
m4a extension is supported.
- You can change the audio tracks on WMV files. Just press Audio key on the remote.
- When you play audio files, it will start slideshow if there are picture files on the same folder or Autojpg.
It will check the same folder and then Autojpg folder.
This is useful if you put the album art on the same folder
6.2.3 Image Playback
Only the PHOTO folder will show in the TViX HD when pressing the PHOTO button on the remote control. It applies only to the active partition if you have more than one partition.
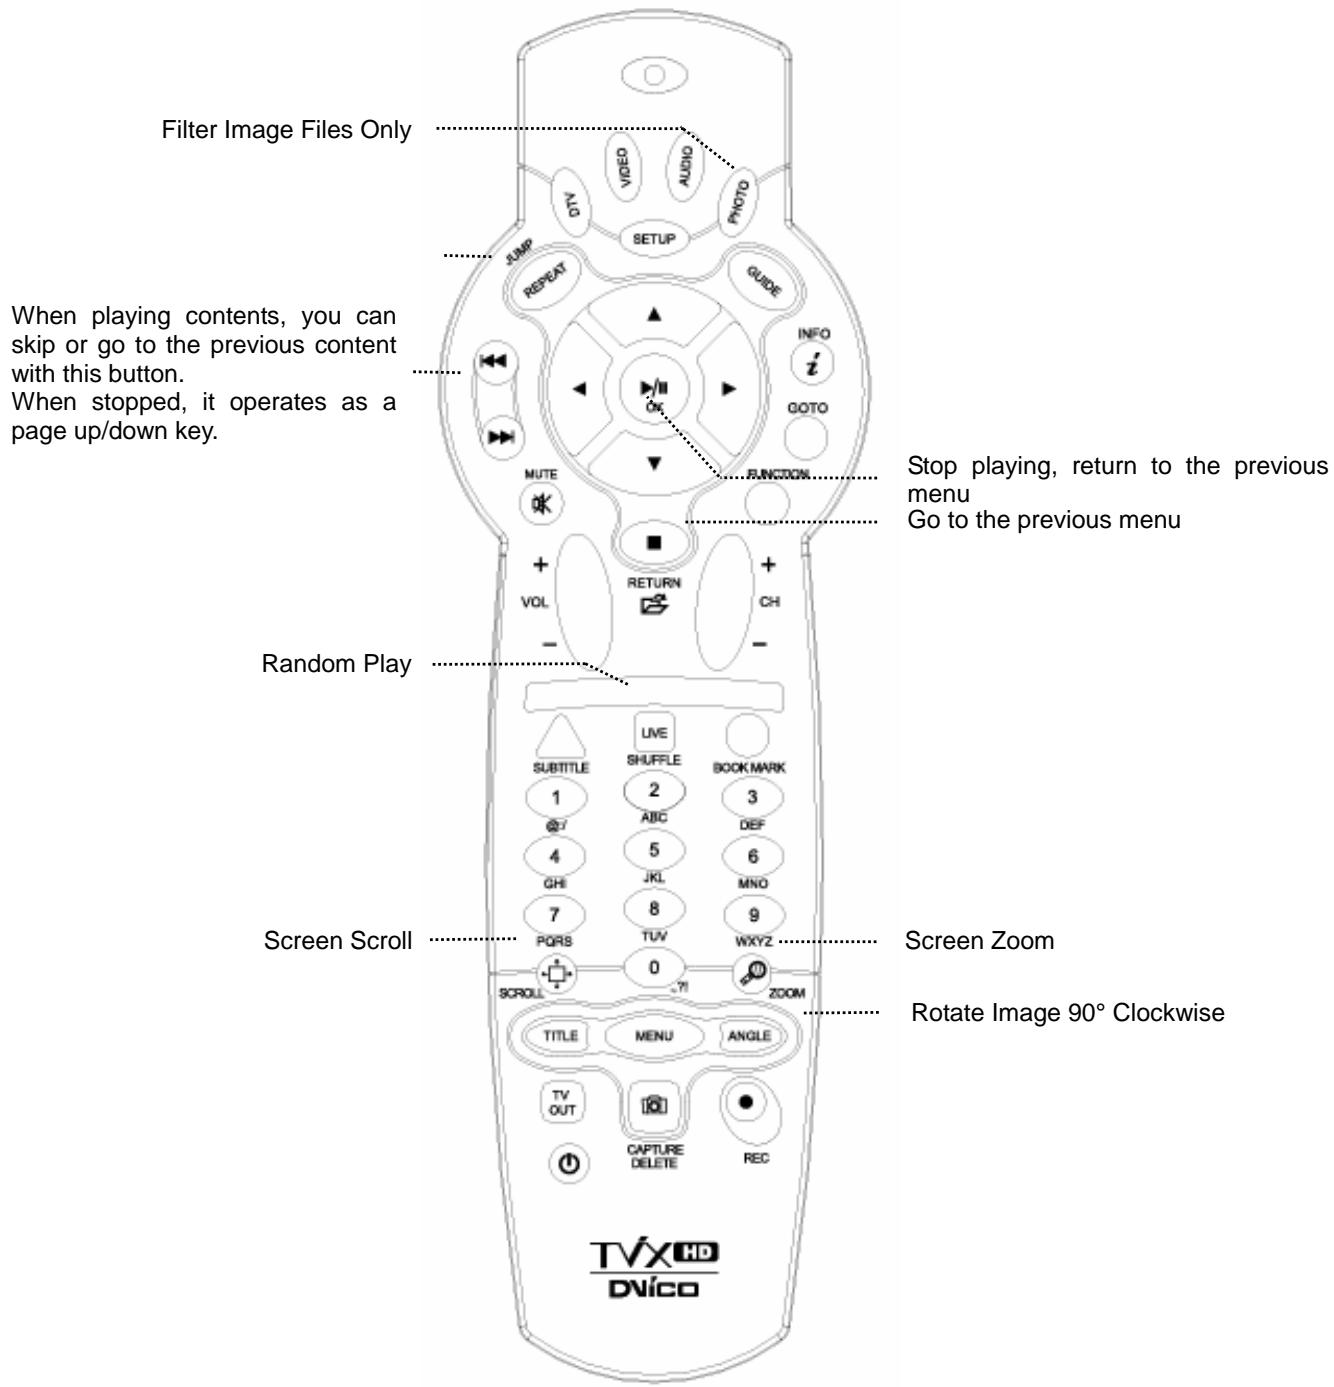
- You can set the slideshow time interval at the SETUP menu.
- You can change the size of the picture with the ZOOM and SCROLL button.

- Some non-standard JPEG files may not be displayed
- If you press the SETUP button, you will see in sequence the Contrast Brightness Saturation menus. In these menus, you can adjust the Contrast, Brightness and Saturation by pressing the left/right arrow buttons.
- When you see the picture files, you can play background music.
It will check the Autoaudio or Automp3 folder on the root folder of current partition.
If it plays background music, the large picture files may not seen due to the resource shortage. So if you want to see large files, you should not play background music.
The currently supported maximum resolution of picture is 3264 * 2448. However, this result is without background music. With background music, the supported maximum size is 3072 * 2048.
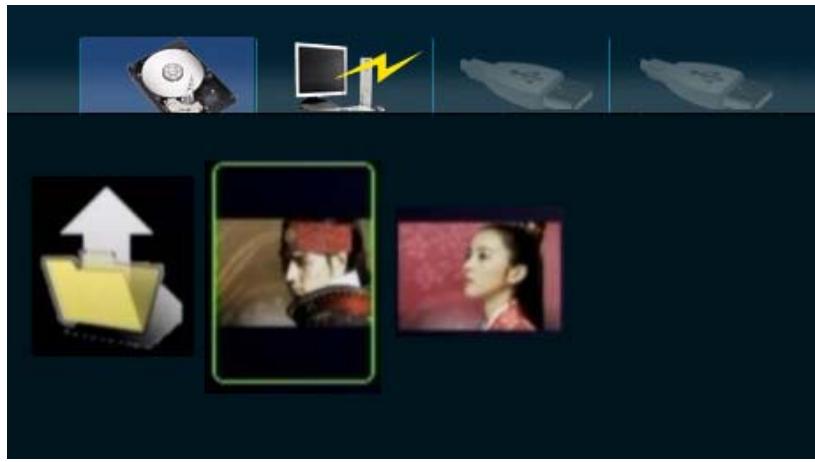
- Support browsing by icon mode
Make a empty file named as "icon(tvix" on the folder that you want to browse by icon.
The file name for the file used for the icon files is case sensitive, it must be the exact same name as the media file except that the extension must be jpg or png(if you want to use transparency, set the transparency color as 0xC8C8C8.)
To show the folder as icon, please put "folder.jpg" or "folder.png" on the folder.
The maximum icon size is 720 * 480 , and the best size is 100 * 136 .
6.3 Extra Features
6.3.1 Using the AutoRun Function
When you want to play music with the TViX HD but do not have any display devices, the following function may come in handy.
- Make a folder and name it, "autorun" in the root directory of the First partition.
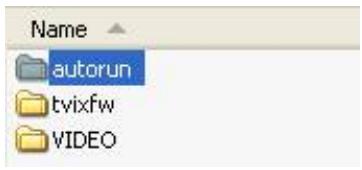
- Copy media file(s) or make a sub folder in the "autorun" folder.
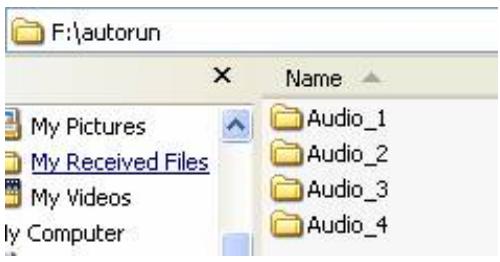
- If you want to change the setup, push the SETUP button on the remote control. Then go to the SETUP/MISC tab. Set AutoRun option to ON. If you set the AutoRun option to OFF, the function will not work. If you select 'Shuffle,' files will play randomly.
- After setting the configuration, turn off the TViX HD and then turn it on again. The TViX HD will play the media file from the first sub folder under '/HDD1/autorun'.
- TViX HD will play files in the subFolders first and then it will play the files in '/HDD1/autorun'. After the TViX HD plays all the media files, it will be repeated again from the beginning.
6.3.2 Using Wallpaper
If you put a JEPG file named "TViX.jpg" under the folder which you want to change the wallpaper, the wallpaper of the folder will be changed.
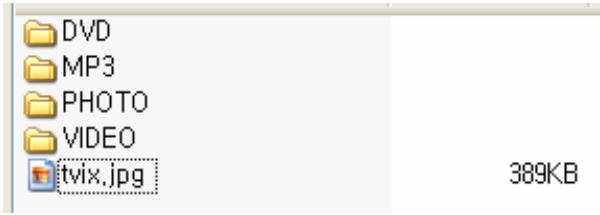
You can select any wallpaper you want by using the various JPEG files of different folders.
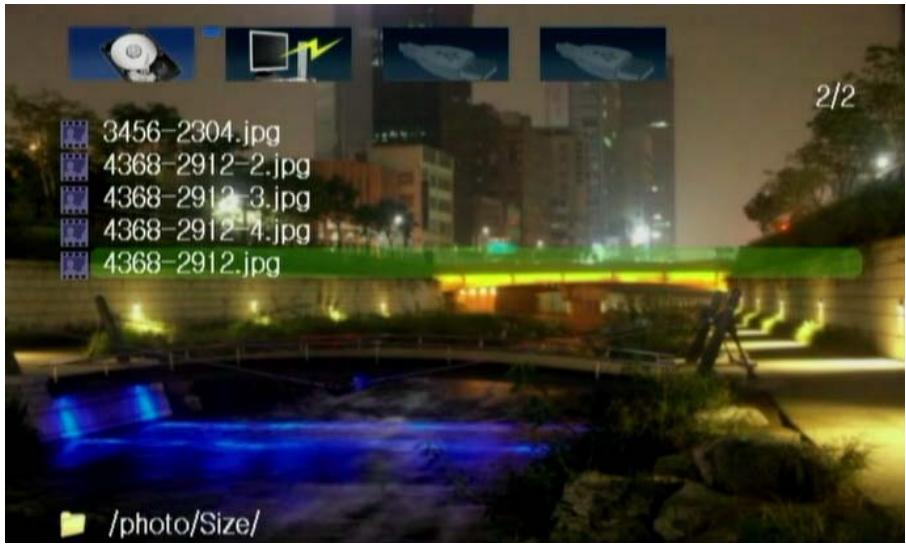
- If you want to change the basic wallpaper, put a JPEG file named TViX.jpg under the Root directory.
You can use both lower and capital letters for the file name "TViX.jpg". - 720*480 pixel is recommended for the size of the wallpaper. (A larger size may increase the loading time)
- In Windows XP, when you name the JPEG file, "Hide extensions for known file types" should be unchecked in the Tool-Folder Option-View-File/Folder. Otherwise the JPEG file could be named as TViX.jpg.JPG and you would not be able to see your desired wallpaper.
6.3.3 Playing Background Music while Watching Picture Slideshows
(1) Make an autojpg folder in the HDD of TViX HD and copy image files.
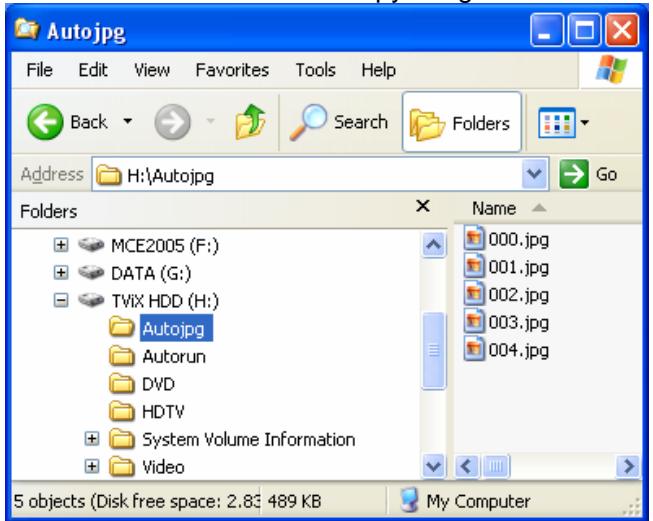
(2) While users are watching the picture slideshow, the MP3 files can be played as background music. Pressing 0 button, and you can see the audio list. You can select another file in there.

TIPS
- If the SHUFFLE button is pressed after you have begun playing MP3 files with the "Play" button, only MP3 files will play in shuffle play mode.
- Slideshowhow delay time can be adjusted in the setup menu (press the “setup” button on your remote control)
- You can stop/start the slide show using the REPEAT button..
- If you have a .lrc file, lyrics will be automatically shown.
- The slideshow of picture mode.
Slide once : It will stop after showing all files on the current folder
Slide off : It will show the current picture and stop. To see next or previous file, you must change.
Slide loop : It will loop forever.
<< Using WinAMP Playlist (.m3u) >>
(1) Connect TViX to PC.
(2) Open the files that is stored at TViX in "Winamp" Program.
(3) Select the folder you want at Winamp after pressing SaveList,
You should save the files at the same partition where the opened files were stored.
(4) Disconnect TViX from PC/Mac safely.
6.3.4 Using Internet Radio
* Notice
- TViX can be connect via network
- Download the .pls file or .m3u (WinAmp playlist) file.
- Before play the .pls or .m3u file, you must set the network setting (DHCP or Static IP).
- TViX supports only shoutcast streaming format and doesn't support other proprietary streaming formats
TViX is available to shoutcast method and don't support private server.
1. Download the .pls file.
You have to browse the radio station site like www.shoutcast.com
SHOUTcast is Nullsoft's Free distributed streaming audio system. Thousands of broadcasters around the world are waiting for you to tune in and listen. Take a peek through the SHOUTcast directory to start browsing the most popular stations. Be sure to select your connection speed and then what kind of music you're looking for over on the right hand side for optimal listening pleasure.
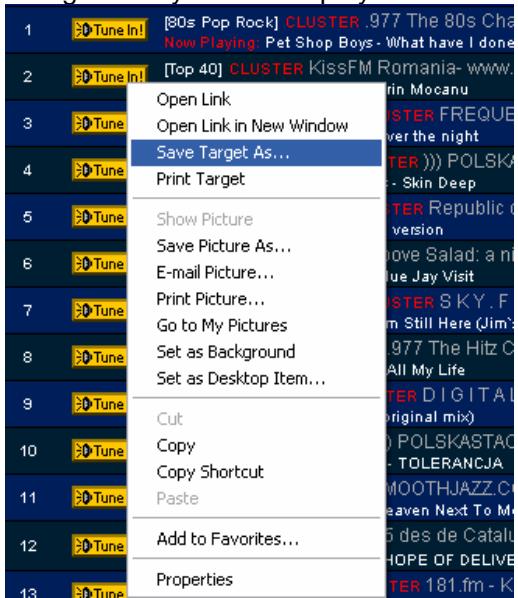
- Right click you want to play--> select Save Target As... and save the .pls file into TViX or share folder.
- Edit the playlist file.
You can edit downloaded playlist(.pls) file using the WinAMP program. - Run WinAMP--> Open playlist and select downloaded .pls file.
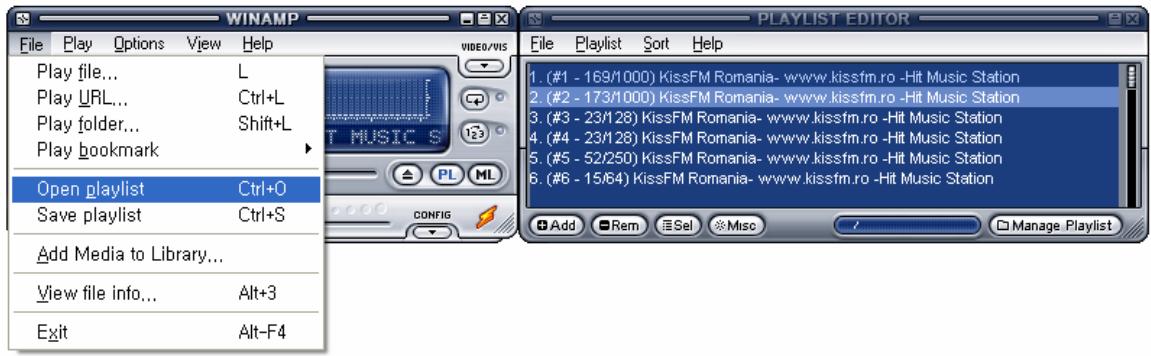
- You can remove unnecessary items from the pls/m3u file using the PLAYLIST
- Save the playlist to .m3u or .pls extension.
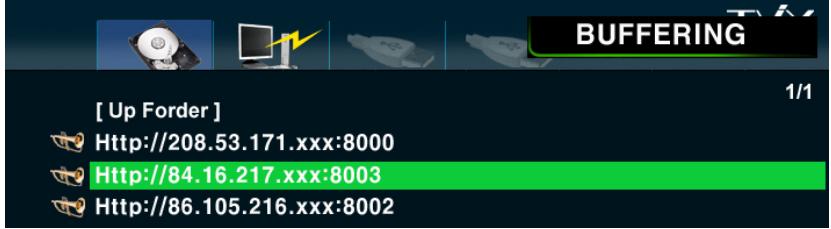
- Point and click the .pls or .m3u file in the TViX hard disk or network share folder (ex: tvixhd1)
- After a while, you can hear the internet radio.
7 Firmware Upgrade
Firmware Version Check.
- Connect the TViX HD to your TV and then turn on the TViX HD
- Press the SETUP button on the top panel and the setup screen will be displayed.
- Check the latest firmware version of TViX HD at www.tvix.co.kr
*** You'll be posted for any firmware updates or news if you fill out the customer registration form at http://www.tvix.co.kr
Downloading the Firmware.
- Download the latest firmware from http://www.tvix.co.kr to your PC.
- Connect the TViX HD to your PC with a USB and then turn it on.
- Your system will recognize the TViX HD as an external hard drive.
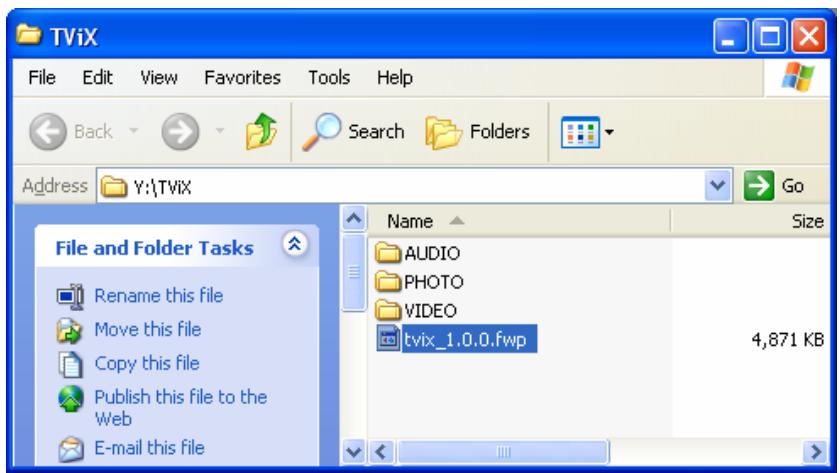
- Copy the latest firmware files into the root of the TVIX HD hard drive.
- Turn off the TViX HD and bring it to your TV for firmware upgrading.
How to Upgrade the Firmware
- Connect the TViX HD to your TV
- Select the copied firmware file (ex: TViX1.0.1.fwp) and press OK on the remote to start upgrading.
- The following screen will be displayed. Follow the instructions on the screen.
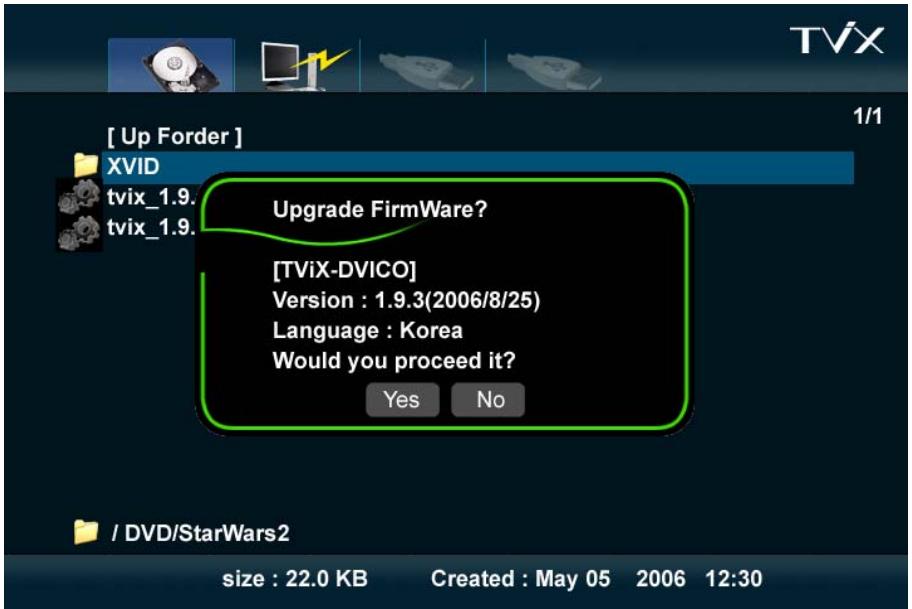
- Erasing the old firmware is in process.
ERASING...
5%
- New firmware upgrade is in process (takes about 1 minute). When the upgrade is successfully finished, the TViX HD will reboot automatically.
Now upgrade in process...
6%
< CAUTIONS: Safe Mode Upgrading >
Even if the TViX accidentally turns off during the firmware upgrade, the safe mode will enable the TViX to be re-upgraded.
Please follow the steps below:
- Connect the TViX to your PC with a USB and then turn it on.
- Make a tvixfw folder in your primary partition.
- Copy the latest firmware file into the tvixfw folder of the TVIX hard drive.
- Press the SETUP button on the top panel and turn on the TViX HD.
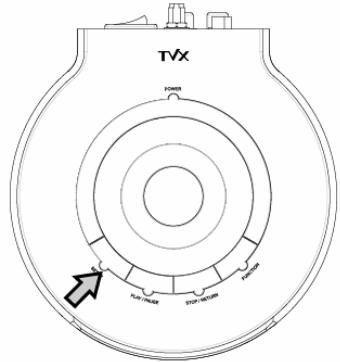
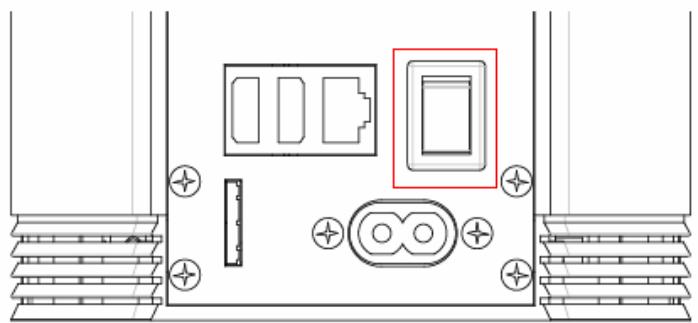
- The VFD will show the copied firmware version, like HDD1/FW 1:01:00.
- Press OK on the remote control to start upgrading.
- The VFD will show PRE when erasing the old firmware is in process.
- The VFD will show UPG when the new firmware upgrade is in process.
- The TViX will automatically reboot after the upgrade has been successfully finished.
8 Using USB Connection with the PC
TViX HD uses a 3.5" HDD as its contents storage device and works just like an external USB 2.0 hard drive when you connect it to your PC.
You need to ensure that your HDD is set to master mode, and connected to the IDE cable and power cable before using it on your PC.
The USB cable has a different shape on both ends. We use USB 2.0 "A" Plug (male) type to "B" Plug(male) type.
After connecting to your PC, turn the power switch on.
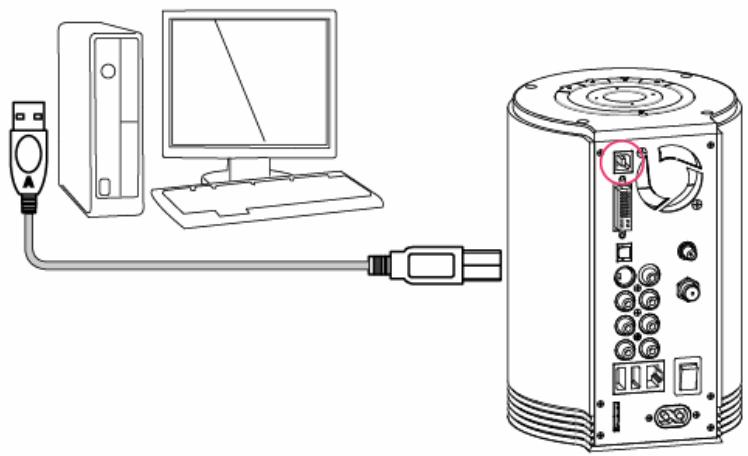
If you are a Windows98SE user, you should download a USB storage driver from our web site www.tvix.co.kr before you connect your TViX HD with your system. You do not need to install the driver under Windows ME/2000/XP.
8.1 Windows 98SE Driver Installation
1) You should download a USB storage driver from our web site www(tvix.co.kr and run installer before connecting the TViX.
Press "Next" on the following pop up screen.
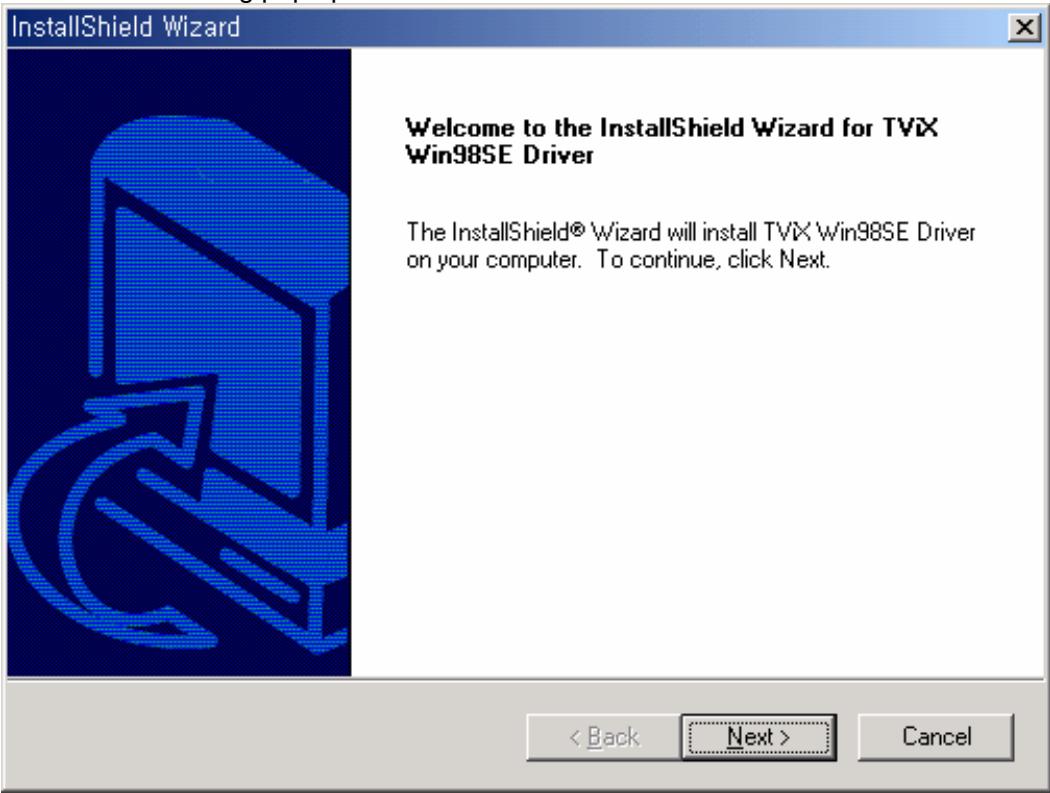
2) Press the "Finish" button to reboot.

InstallShield Wizard Complete
The InstallShield Wizard has successfully installed TVX Win98SE Driver.Before you can use the program, you must restart your computer.
Yes, I want to restart my computer now.
No. I will restart my computer later.
Remove any disks from their drives, and then click Finish to complete setup.
<Back
Finish
Cancel
3) After rebooting the system, connect the TViX HD. Add New Hardware Wizard will automatically pop up.
Add New Hardware Wizard
This wizard searches for new drivers for:
DvICO USB-ATA Bridge
A device driver is a software program that makes a hardware device work.
<Back
Next>
Cancel
4) Select "Search for the best driver for your device" menu and then press the Next button.
Add New Hardware Wizard
What do you want Windows to do?
Search for the best driver for your device. (Recommended).
Display a list of all the drivers in a specific location, so you can select the driver you want.
<Back
Next>
Cancel
5) Do not change any of the menus. Just click "Next".
Add New Hardware Wizard
Windows will search for new drivers in its driver database on your hard drive, and in any of the following selected locations. Click Next to start the search.
Floppy disk drives
CD-ROM drive
Microsoft Windows Update
Specify a location:
E:\Setup0.86\Driver
Browse...
<Back
Next>
Cancel
6) As shown in the pop up the system will find DVICO USB-ATA Bridge automatically. Press the "Next" button.
Add New Hardware Wizard
Windows driver file search for the device:
DVICO USB-ATA Bridge
Windows is now ready to install the best driver for this device. Click Back to select a different driver, or click Next to continue.
Location of driver:

C:\WINOWS\INF\NECUSBMP.INF
<Back
Next>
Cancel
7) Press the "Finish" button and the driver installation will be finished.
Add New Hardware Wizard

DvICO USB-ATA Bridge
Windows has finished installing the software that your new hardware device requires.
<Back
Finish
Cancel
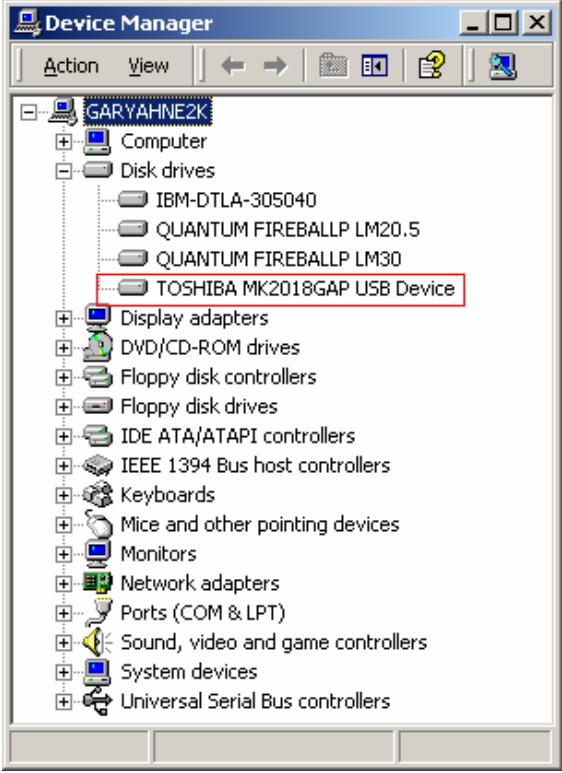
8) You will be able to see the disk drive inside the TViX HD in the Device Manager tab.

Windows ME/2000/ XP will automatically provide the driver, so you do not have to install any extra software. Run Plug & Play when connecting the TViX HD. Right click the icon "My computer" then click properties hardware device manager to see if TViX HD has been properly installed.

8.2 Making a Partition and Formatting the HDDs under Windows 98SE / ME
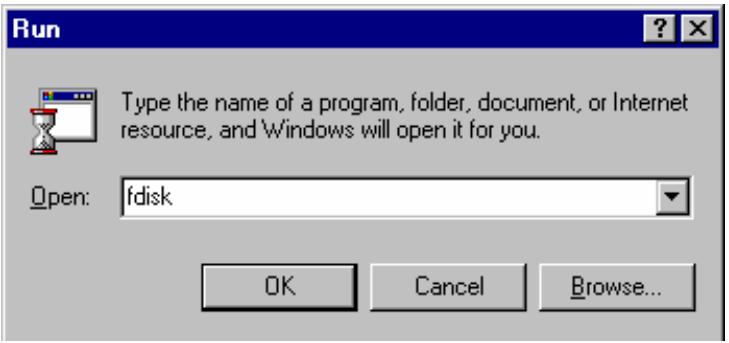
Click "Start" and select "Run" and the "Run" window will appear as shown below. Type "fdisk" in the text box of the "Run" window and then click the "OK" button.
1) The following DOS window will appear for the partition program.
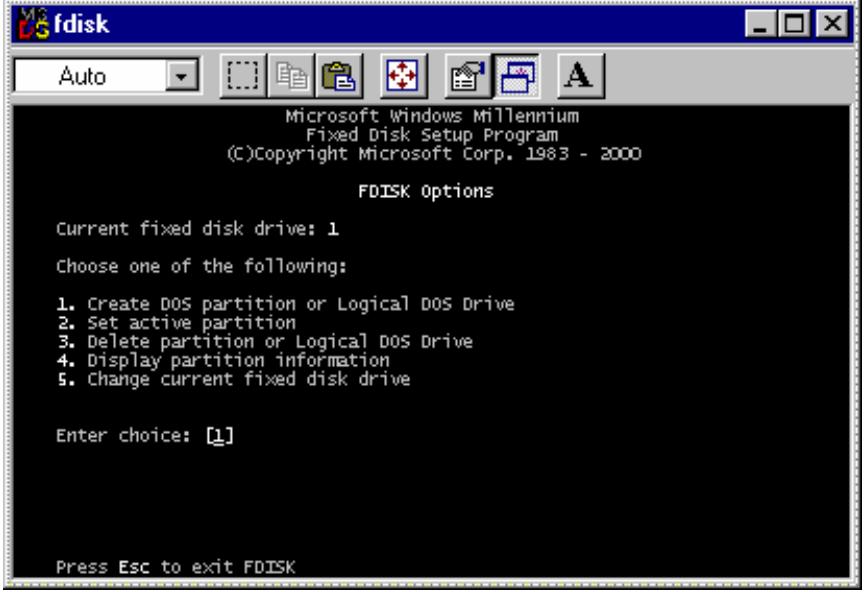
2) To make a new partition, choose number 5 to select the HDD in TViX HD.
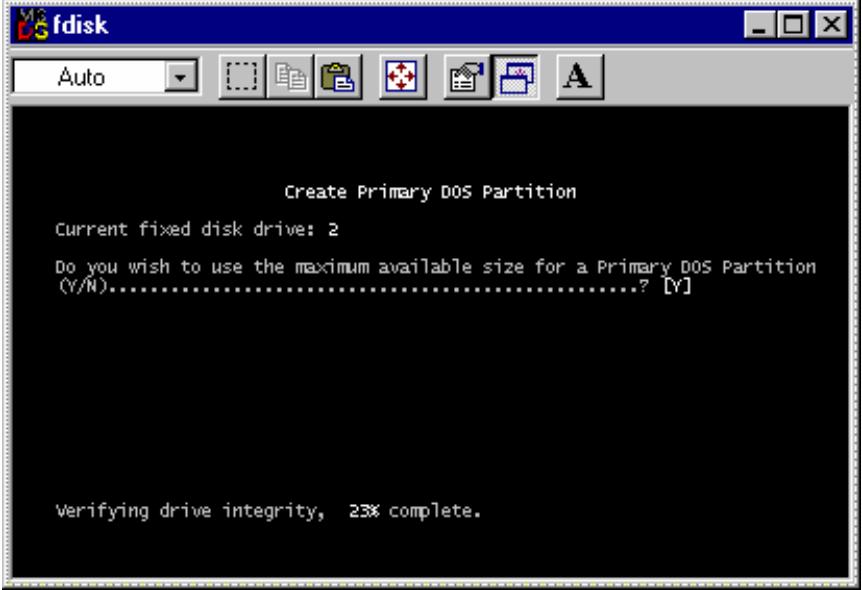
3) To make the partition for the HDD, choose the partition type and size. After selecting, make the partition.
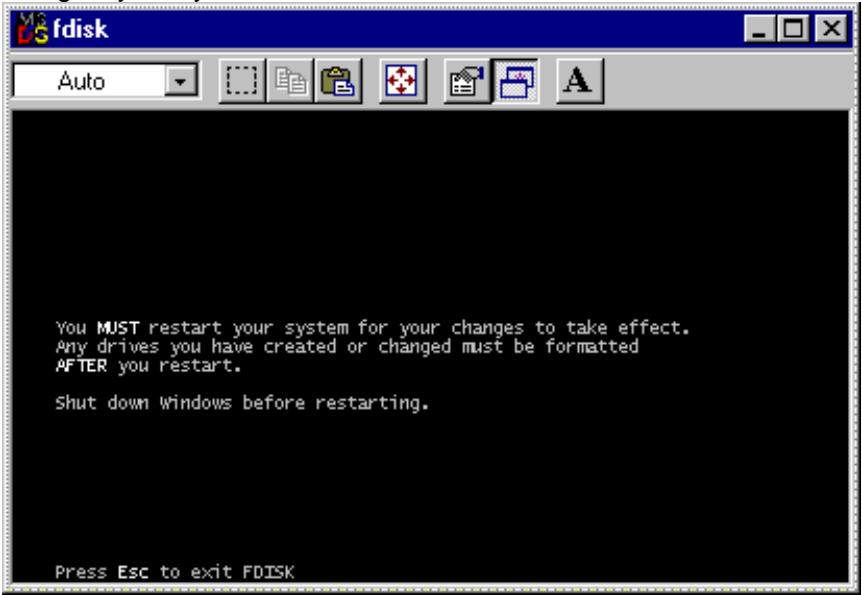
4) After making partitions, do not reboot the system. Instead turn off the power of the TViX and then turn it back on. By doing so your system will reinitialize the TViX HD.
5) Run Window explorer and you will find the new disk created. Right click the new disk and choose "Format" from the pop up menu. Then start formatting your HDD in TViX HD.

8.3 Making a Partition and Formatting the HDDs under Windows 2000 / XP
1) Under Windows 2000, you can make a partition and format the HDD using the Disk Manager utility.
2) Right click "My Computer" Choose "manage" from the pop up menu and the "Computer Management" window will appear choose "Disk Management" folder.
3) The disk list will appear on the right side of the "Computer Management" windows. Right click the TViX HDD from the list, and from the pop up menu choose "make partition" to create partitions on the chosen disk.
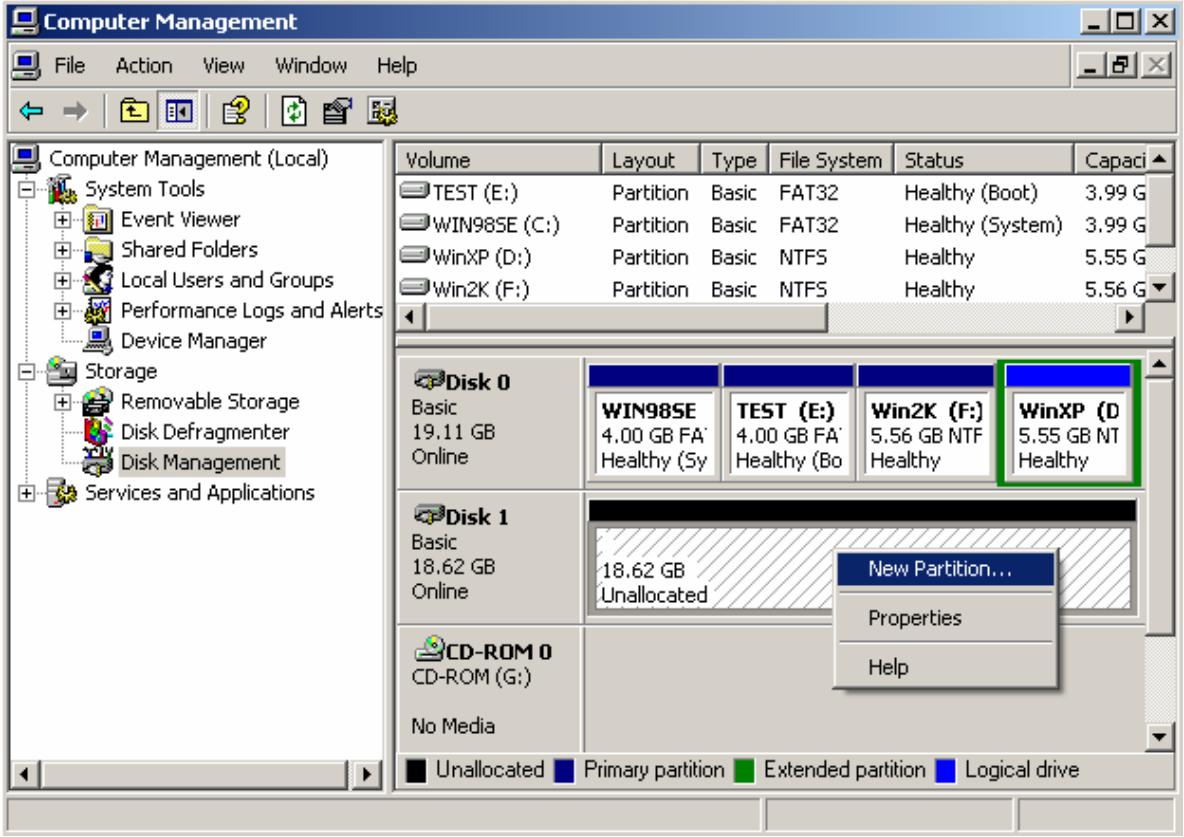
4) When the New Partition Wizard appears, press "Next>".
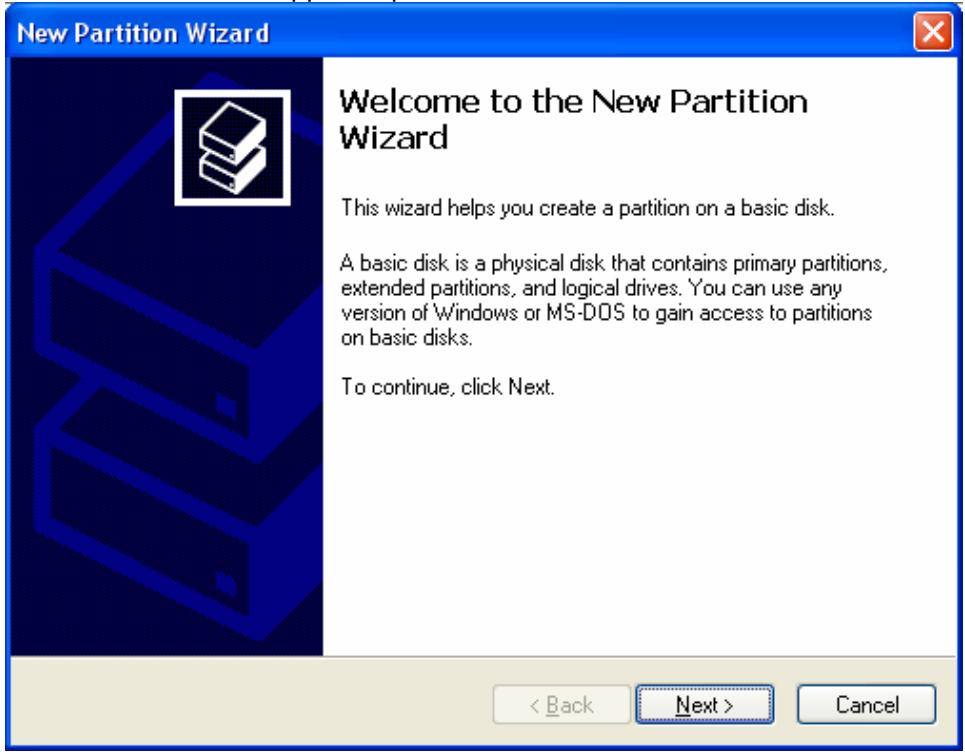
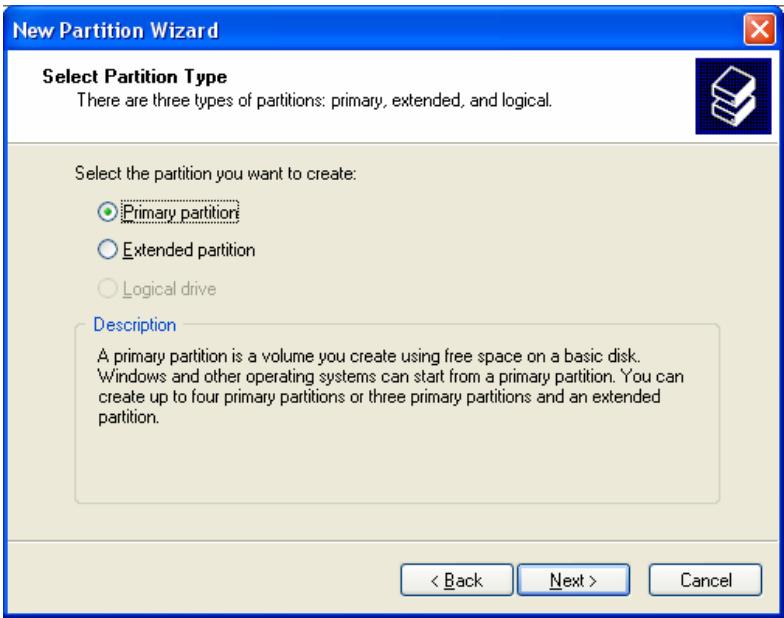
5) Choose the partition type and format the HDD. If you want several partitions, select Extended Partition.
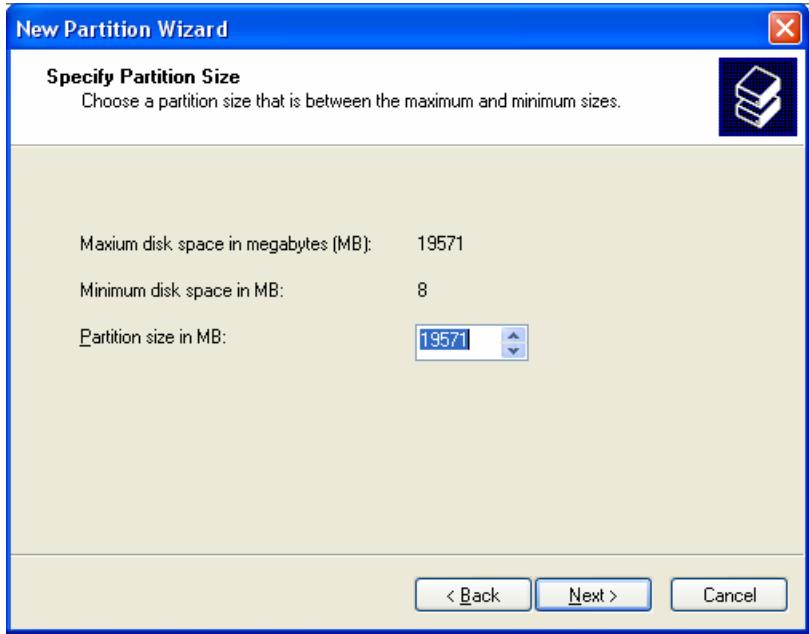
5) Select the partition size. If you want one partition, press "Next>. For FAT32, size is limited to 32000MB or under.
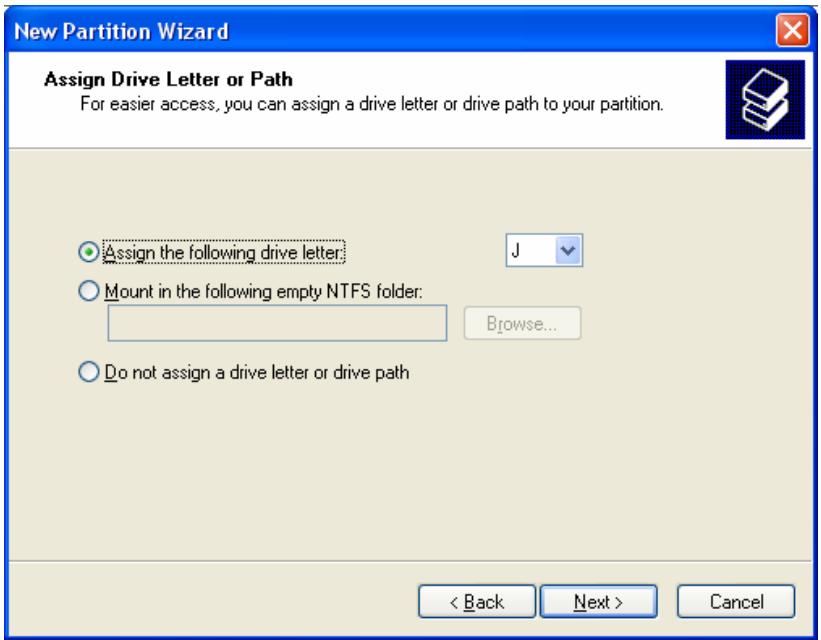
5) Select the Drive Letter. Then press the "Next>" button.
5) Select the partition Format. If you want FAT32, it is limited to 32GBs.
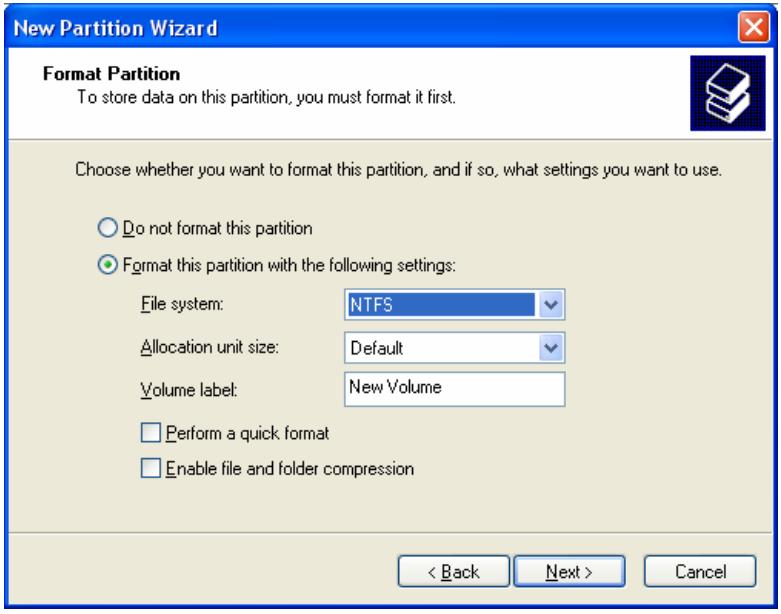
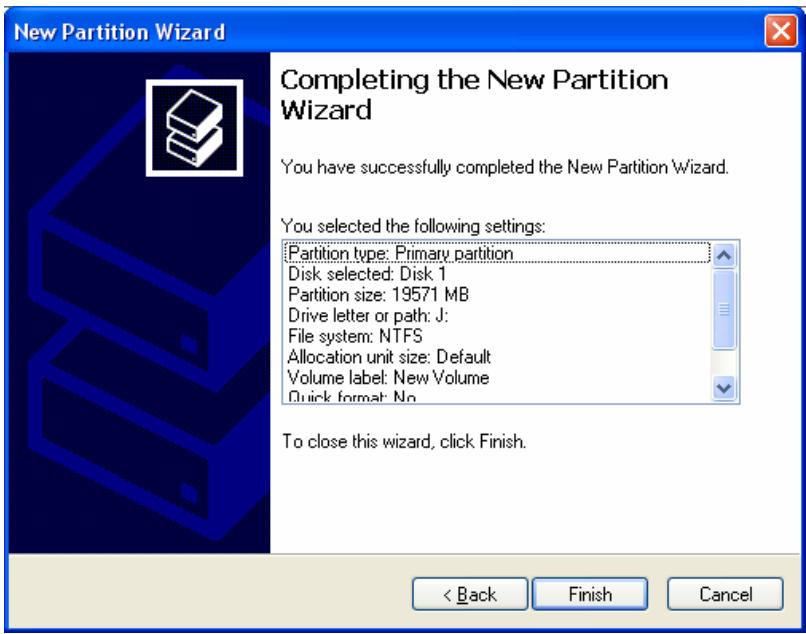
5) When completed, detailed information will appear as shown below. Click the "OK" button to finish.
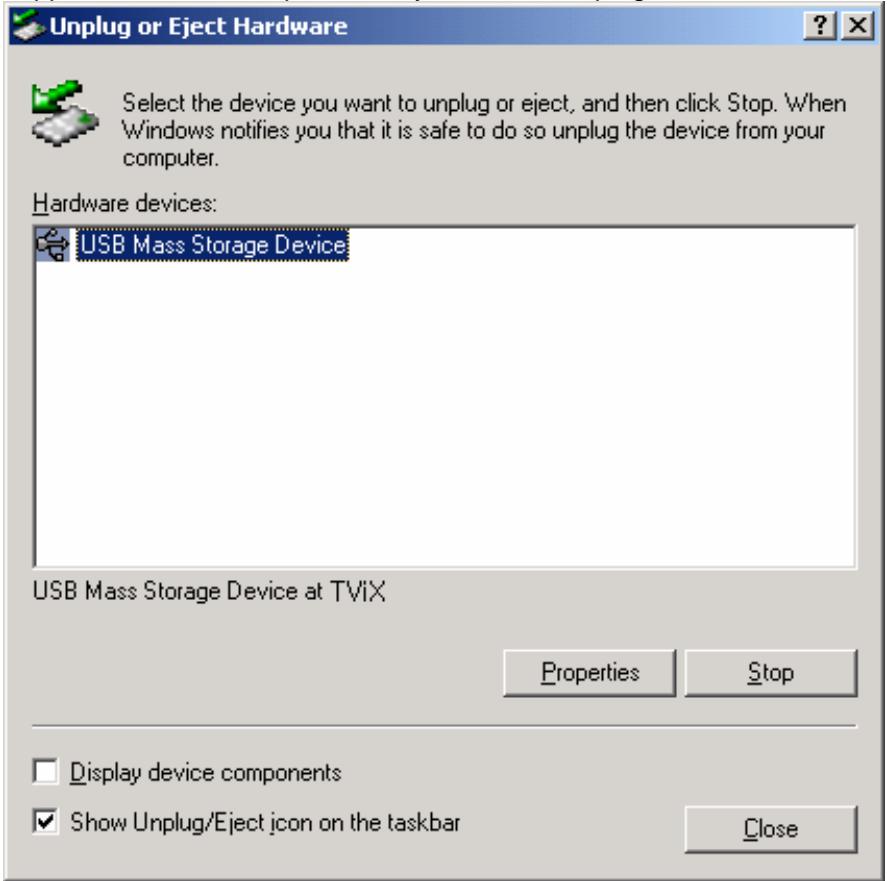
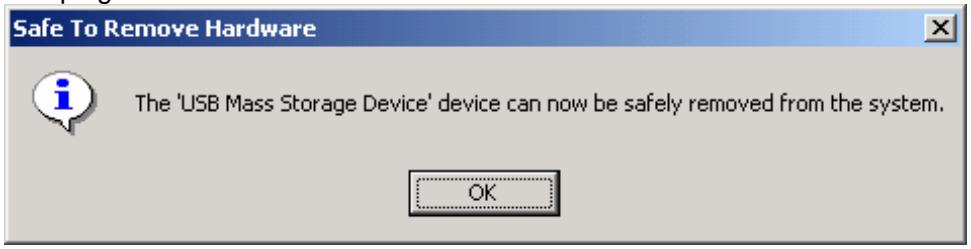
8.4 Unplug or Eject Hardware
1) On the windows tray,

double click the hot swap icon. The "Unplug or Eject Hardware" button if you want to unplug the device.
2) Press OK on "Stop a Hardware device" window.
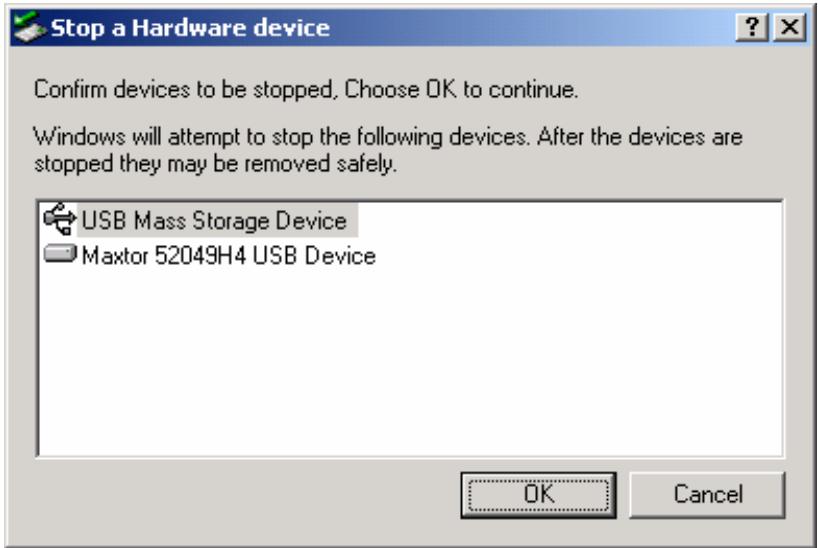
3) Press OK and unplug the device.
9 Appendix - Technical Terms
DivX
DivX is the name of a revolutionary new video codec which is based on the new MPEG-4 compression standard for video. When you install a video codec on your system it basically works as an add-on to your system with instructions on how to compress/decompress video in that video format. Once you've installed the DivX codec on your system you will be able to play DivX movies using Windows Media Player or any other DivX-enabled player.
Despite the fact that DivX movies offer better compression and higher quality video than regular MPEG movies it takes more time to encode due to the incredible compression technology. The DivX codec makes it possible to compress/encode a full-length movie at near DVD-quality, which is small enough to fit on a single CD (700MB). The DivX video is usually combined with MP3 audio to produce both high quality video and audio.
XviD
XviD is the name of a new open-source video codec, which like the DivX is based on the new MPEG-4 compression standard for video. It's currently being developed by people from all over the world. When you install a video codec on your system, it basically works as an 'add-on' to your system with instructions on how to compress/decompress video in that video format. Once you've installed the XviD codec on your system you will be able to play XviD movies using Windows Media Player or any other XviD-enabled player.
MPEG
MPEG stands for Motion Picture Experts Group. This is the same group that made the MPEG-1 (used in VideoCDs), MPEG-2 (used in DVD and SuperVCDs and other high bandwidth systems) and MPEG-4 (ASF, DivX, WMV, low-mid bandwidth systems) standards. They are also responsible for MP3 (MPEG Audio Layer 3) and AAC audio compression standards.
VOB
VOB stands for Video Objects. DVD movies are stored in VOB files. Each VOB file has a number of video/audio/subpicture streams.
SUBPICTURE
A subpicture stream found in VOB files normally refers to the subtitles. Subtitles on DVDs are not stored as "text," but rather as a video stream. A subpicture stream is one that overlays on top of the main picture stream (ie. the movie), and on a DVD the subpicture stream can be turned on and off.
AVI
AVI stands for Audio Video Interleave. AVI is a file format, like MP3 or JPG. But unlike these formats, AVI is a container format, meaning it can contain video/audio compressed files using many different combinations of codec. Therefore, while MP3 and JPG can only contain a certain kind of compression (MPEG Audio Layer 3 and JPEG), AVI can contain many different kinds of compression (eg. DivX video + WMA audio or Indeo video + PCM audio) as long as a codec is available for encoding/decoding. All AVI files look the same on the "outside", but on the "inside", they may be completely different. Almost all tools on this site are not just DivX tools, but also AVI tools, so will work with many other codec.
AC3
Initially known as Audio Coding 3, AC3 is a synonym for Dolby Digital these days. Dolby Digital is an advanced audio compression technology allowing to encode up to 6 separate channels at bit-rates up to 448kbit/s. For more information please check out the Dolby website.
DTS
By supplying film studios with outstanding techniques for delivering soundtracks to an attentive audience, DTS digital sound is now featured on virtually 100% of major Hollywood releases. Although the technology
used for motion pictures differs from that featured in consumer and professional audio music and home theater systems, their DTS heritage means end users can enjoy sound that closely matches the original.
WMA
WMA stands for Windows Media Audio. It is a proprietary format developed by Microsoft for audio streaming and compression. WMA files, theoretically, has double the compression rate of MP3s, although this is debatable.
Ogg Vorbis
Ogg Vorbis is a new audio compression format. It is roughly comparable to other formats used to store and play digital music, such as MP3, VQF, AAC, and other digital audio formats. It is different from these other formats because it is completely free, open, and unpatented.
Ogg Vorbis has been designed to completely replace all proprietary, patented audio formats. That means that you can encode all your music or audio content in Vorbis and never look back.
480p
480 progressive; form of standard-definition digital television (SDTV) comparable to VGA computer displays but not considered high-definition television (HDTV), though 480p is discernibly cleaner and slightly sharper than analog television. The native resolution of DVD is 480p, but that resolution can be seen only if a DVD player outputs a progressive-scan signal and the DTV has progressive-scan or component-video inputs; it is also known as EDTV.
480i
480 interlaced; form of standard-definition digital television (SDTV) that approximates the quality of analog television but not considered high-definition television (HDTV). Even though the native resolution of DVDs is 480p, they are viewed at 480i on an NTSC analog television.
720p
720 progressive. One of two currently used formats designated as high-definition television in the ATSC DTV standard, this technology comprises 720 vertical pixels and 1,280 horizontal pixels. The p stands for progressive, as opposed to interlaced, scanning, which is used in the other accepted HDTV standard, known as 1080i. Contrary to myth, 720p is not inferior to 1080i; 720p has fewer lines but also has the advantages of progressive scanning and a constant vertical resolution of 720 lines, making it better able to handle motion.
1080i
1080 interlaced; one of two formats designated as high-definition television in the ATSC DTV standard, with 1,080 vertical pixels by 1,920 horizontal pixels. The i stands for interlaced, as opposed to progressive scanning, used in the second HDTV standard, 720p. Contrary to myth, 1080i is not superior to 720p; 1080i has more scanning lines but also suffers the disadvantages of interlaced scanning.
NTSC
The NTSC (National Television Standards Committee) was responsible for developing, in 1953, a set of standard protocol for television (TV) broadcast transmission and reception in the United States. Two other standards - Phase Alternation Line (PAL) and Sequential Couleur avec Memoire (SECAM) - are used in other parts of the world. The NTSC standards have not changed significantly since their inception, except for the addition of new parameters for color signals. NTSC signals are not directly compatible with computer systems.
An NTSC TV image has 525 horizontal lines per frame (complete screen image). These lines are scanned from left to right and from top to bottom. Every other line is skipped. Thus it takes two screen scans to complete a frame: one scan for the odd-numbered horizontal lines, and another scan for the even-numbered lines. Each half-frame screen scan takes approximately 1/60 of a second; a complete frame is scanned every 1/30 second. This alternate-line scanning system is known as interlacing.
PAL
Phase Alternation Line (PAL) is the analog television display standard that is used in Europe and certain other parts of the world. PAL is one of the three major TV standards together with the American National Television Systems Committee(NTSC) color television system and the French Sequential Couleur avec Memoire (SECAM). NTSC is also used in Japan. SECAM is used in countries of the former Soviet Union.
Like SECAM, PAL scans the cathode ray tube (CRT) horizontally 625 times to form the video image. NTSC scans 525 lines. Color definitions between the systems vary slightly.
10 GNU General Public License
Dvico Co., Ltd is using a part of Free Software code under the GNU General Public License in operating TViX player. This General Public License applies to most of the Free Software Foundation's code and to any other program whose authors commit by using it. The Free Software is copyrighted by Free Software Foundation, Inc. and the program is licensed "As is" without warranty of any kind. Users are free to download the base source code of the Dvico TViX players at the following Address: www.tvix.co.kr/gpl The source code can be sent to your address via airmail for a charge of actual expense executed. Please contact us at sales@dvico.com
GNU GENERAL PUBLIC LICENSE
Version 2, June 1991
Copyright (C) 1989, 1991 Free Software Foundation, Inc.
51 Franklin Street, Fifth Floor, Boston, MA 02110-1301, USA
Everyone is permitted to copy and distribute verbatim copies of this license document, but changing it is not allowed. Preamble
The licenses for most software are designed to take away your freedom to share and change it. By contrast, the GNU General Public License is intended to guarantee your freedom to share and change free software-- to make sure the software is free for all its users. This General Public License applies to most of the Free Software Foundation's software and to any other program whose authors commit to using it. (Some other Free Software Foundation software is covered by the GNU Lesser General Public License instead.) You can apply it to your programs, too.
When we speak of free software, we are referring to freedom, not price. Our General Public Licenses are designed to make sure that you have the freedom to distribute copies of free software (and charge for this service if you wish), that you receive source code or can get it if you want it, that you can change the software or use pieces of it in new free programs; and that you know you can do these things.
To protect your rights, we need to make restrictions that forbid anyone to deny you these rights or to ask you to surrender the rights. These restrictions translate to certain responsibilities for you if you distribute copies of the software, or if you modify it.
For example, if you distribute copies of such a program, whether gratis or for a fee, you must give the recipients all the rights that you have. You must make sure that they, too, receive or can get the source code. And you must show them these terms so they know their rights.
We protect your rights with two steps: (1) copyright the software, and (2) offer you this license which gives you legal permission to copy, distribute and/or modify the software.
Also, for each author's protection and ours, we want to make certain that everyone understands that there is no warranty for this free software. If the software is modified by someone else and passed on, we want its recipients to know that what they have is not the original, so that any problems introduced by others will not reflect on the original authors' reputations.
Finally, any free program is threatened constantly by software patents. We wish to avoid the danger that redistributors of a free program will individually obtain patent licenses, in effect making the program proprietary. To prevent this, we have made it clear that any patent must be licensed for everyone's free use or not licensed at all.
The precise terms and conditions for copying, distribution and modification follow.
- This License applies to any program or other work which contains a notice placed by the copyright holder saying it may be distributed under the terms of this General Public License. The "Program", below, refers to any such program or work, and a "work based on the Program" means either the Program or any derivative work under copyright law: that is to say, a work containing the Program or a portion of it, either verbatim or with modifications and/or translated into another language. (Hereinafter, translation is included without limitation in the term "modification".) Each licensee is addressed as "you".
Activities other than copying, distribution and modification are not covered by this License; they are outside its scope. The act of running the Program is not restricted, and the output from the Program is covered only if its contents constitute a work based on the Program (independent of having been made by running the Program). Whether that is true depends on what the Program does.
- You may copy and distribute verbatim copies of the Program's source code as you receive it, in any medium, provided that you conspicuously and appropriately publish on each copy an appropriate copyright notice and disclaimer of warranty; keep intact all the notices that refer to this License and to the absence of any warranty; and give any other recipients of the Program a copy of this License along with the Program.
You may charge a fee for the physical act of transferring a copy, and you may at your option offer warranty protection in exchange for a fee.
- You may modify your copy or copies of the Program or any portion of it, thus forming a work based on the Program, and copy and distribute such modifications or work under the terms of Section 1 above, provided that you also meet all of these conditions:
a) You must cause the modified files to carry prominent notices stating that you changed the files and the date of any change.
b) You must cause any work that you distribute or publish, that in whole or in part contains or is derived from the Program or any part thereof, to be licensed as a whole at no charge to all third parties under the terms of this License.
c) If the modified program normally reads commands interactively when run, you must cause it, when started running for such interactive use in the most ordinary way, to print or display an announcement including an appropriate copyright notice and a notice that there is no warranty (or else, saying that you provide a warranty) and that users may redistribute the program under these conditions, and telling the user how to view a copy of this License. (Exception: if the Program itself is interactive but does not normally print such an announcement, your work based on the Program is not required to print an announcement.)
These requirements apply to the modified work as a whole. If identifiable sections of that work are not derived from the Program, and can be reasonably considered independent and separate works in themselves, then this License, and its terms, do not apply to those sections when you distribute them as separate works. But when you distribute the same sections as part of a whole which is a work based on the Program, the distribution of the whole must be on the terms of this License, whose permissions for other licensees extend to the entire whole, and thus to each and every part regardless of who wrote it.
Thus, it is not the intent of this section to claim rights or contest your rights to work written entirely by you; rather, the intent is to exercise the right to control the distribution of derivative or collective works based on the Program.
In addition, mere aggregation of another work not based on the Program with the Program (or with a work based on the Program) on a volume of a storage or distribution medium does not bring the other work under the scope of this License.
- You may copy and distribute the Program (or a work based on it, under Section 2) in object code or executable form under the terms of Sections 1 and 2 above provided that you also do one of the following:
a) Accompany it with the complete corresponding machine-readable source code, which must be distributed under the terms of Sections 1 and 2 above on a medium customarily used for software interchange; or,
b) Accompany it with a written offer, valid for at least three years, to give any third party, for a charge no more than your cost of physically performing source distribution, a complete machine-readable copy of the corresponding source code, to be distributed under the terms of Sections 1 and 2 above on a medium customarily used for software interchange; or,
c) Accompany it with the information you received as to the offer to distribute corresponding source code. (This alternative is allowed only for noncommercial distribution and only if you received the program in object code or executable form with such an offer, in accord with Subsection b above.)
The source code for a work means the preferred form of the work for making modifications to it. For an executable work, complete source code means all the source code for all modules it contains, plus any associated interface definition files, plus the scripts used to control compilation and installation of the executable. However, as a special exception, the source code distributed need not include anything that is normally distributed (in either source or binary form) with the major components (compiler, kernel, and so on) of the operating system on which the executable runs, unless that component itself accompanies the executable.
If distribution of executable or object code is made by offering access to copy from a designated place, then offering equivalent access to copy the source code from the same place counts as distribution of the source code, even though third parties are not compelled to copy the source along with the object code.
- You may not copy, modify, sublicense, or distribute the Program except as expressly provided under this License. Any attempt otherwise to copy, modify, sublicense or distribute the Program is void, and will automatically terminate your rights under this License. However, parties who have received copies, or rights, from you under this License will not have their licenses terminated so long as such parties remain in full compliance.
- You are not required to accept this License, since you have not signed it. However, nothing else grants you permission to modify or distribute the Program or its derivative works. These actions are prohibited by law if you do not accept this License. Therefore, by modifying or distributing the Program (or any work based on the Program), you indicate your acceptance of this License to do so, and all its terms and conditions for copying, distributing or modifying the Program or works based on it.
- Each time you redistribute the Program (or any work based on the Program), the recipient automatically receives a license from the original licensor to copy, distribute or modify the Program subject to these terms and conditions. You may not impose any further restrictions on the recipients' exercise of the rights granted herein. You are not responsible for enforcing compliance by third parties to this License.
- If, as a consequence of a court judgment or allegation of patent infringement or for any other reason (not limited to patent issues), conditions are imposed on you (whether by court order, agreement or otherwise) that contradict the conditions of this License, they do not excuse you from the conditions of this License. If you cannot distribute so as to satisfy simultaneously your obligations under this License and any other pertinent obligations, then as a consequence you may not distribute the Program at all. For example, if a patent license would not permit royalty-free redistribution of the Program by all those who receive copies directly or indirectly through you, then the only way you could satisfy both it and this License would be to refrain entirely from distribution of the Program.
If any portion of this section is held invalid or unenforceable under any particular circumstance, the balance of the section is intended to apply and the section as a whole is intended to apply in other circumstances.
It is not the purpose of this section to induce you to infringe any patents or other property right claims or to contest validity of any such claims; this section has the sole purpose of protecting the integrity of the free software distribution system, which is implemented by public license practices. Many people have made generous contributions to the wide range of software distributed through that system in reliance on consistent application of that system; it is up to the author/donor to decide if he or she is willing to distribute software through any other system and a licensee cannot impose that choice.
This section is intended to make thoroughly clear what is believed to be a consequence of the rest of this License.
- If the distribution and/or use of the Program is restricted in certain countries either by patents or by copyrighted interfaces, the original copyright holder who places the Program under this License may add an
explicit geographical distribution limitation excluding those countries, so that distribution is permitted only in or among countries not thus excluded. In such case, this License incorporates the limitation as if written in the body of this License.
- The Free Software Foundation may publish revised and/or new versions of the General Public License from time to time. Such new versions will be similar in spirit to the present version, but may differ in detail to address new problems or concerns.
Each version is given a distinguishing version number. If the Program specifies a version number of this License which applies to it and "any later version", you have the option of following the terms and conditions either of that version or of any later version published by the Free Software Foundation. If the Program does not specify a version number of this License, you may choose any version ever published by the Free Software Foundation.
- If you wish to incorporate parts of the Program into other free programs whose distribution conditions are different, write to the author to ask for permission. For software which is copyrighted by the Free Software Foundation, write to the Free Software Foundation; we sometimes make exceptions for this. Our decision will be guided by the two goals of preserving the free status of all derivatives of our free software and of promoting the sharing and reuse of software generally.
NO WARRANTY
-
BECAUSE THE PROGRAM IS LICENSED FREE OF CHARGE, THERE IS NO WARRANTY FOR THE PROGRAM, TO THE EXTENT PERMITTED BY APPLICABLE LAW. EXCEPT WHEN OTHERWISE STATED IN WRITING THE COPYRIGHT HOLDERS AND/OR OTHER PARTIES PROVIDE THE PROGRAM "AS IS" WITHOUT WARRANTY OF ANY KIND, EITHER EXPRESSED OR IMPLIED, INCLUDING, BUT NOT LIMITED TO, THE IMPLIED WARRANTYES OF MERCHANTABILITY AND FITNESS FOR A PARTICULAR PURPOSE. THE ENTIRE RISK AS TO THE QUALITY AND PERFORMANCE OF THE PROGRAM IS WITH YOU. SHOULD THE PROGRAM PROVE DEFECTIVE, YOU ASSUME THE COST OF ALL NECESSARY SERVICING, REPAIR OR CORRECTION.
-
IN NO EVENT UNLESS REQUIRED BY APPLICABLE LAW OR AGREED TO IN WRITING WILL ANY Copyright HOLDER, OR ANY OTHER PARTY WHO MAY MODIFY AND/OR REDISTRIBUTE THE PROGRAM AS PERMITTED ABOVE, BE LIABLE TO YOU FOR DAMAGES, INCLUDING ANY GENERAL, SPECIAL, INCIDENTAL OR CONSEQUENTIAL DAMAGES ARISING OUT OF THE USE OR INABILITY TO USE THE PROGRAM (INCLUDING BUT NOT LIMITED TO LOSS OF DATA OR DATA BEING RENDERED INACCURATE OR LOSSES SUSTAINED BY YOU OR THIRD PARTIES OR A FAILURE OF THE PROGRAM TO OPERATE WITH ANY OTHER PROGRAMS), EVEN IF SUCH HOLDER OR OTHER PARTY HAS BEEN ADVISED OF THE POSSIBILITY OF SUCH DAMAGES.